
TS
androidmedia
MTK 65XX Platform Modifications

Thread ini didedikasikan untuk Rooting, Modification, ROM's sharing buat HH dg MTK 65XX.
NOTE: Following Procedures and Drivers are applicable to ALL MediaTek devices on MT65xx platform, i.e. MT6573, MT6575, MT6577 & MT6589
Credits to my Russian speaking community from 4PDA.ru & forum.china-iphone.ru for knowledge database and huge support materials. Mostly patches, fixes & ROMs will be re-posted from mentioned web resources.
--------------------------------------------------------------------------------------------------------
A. Tools dan Drivers yg dibutuhin:
Spoiler for Drivers & Tools:
--------------------------------------------------------------------------------------------------------
B. Instruksi untuk install Drivers
Spoiler for Drivers Installation:
--------------------------------------------------------------------------------------------------------
C. Tutorial untuk Flashing
Spoiler for Flashing:
NOTE 1:Jika anda memakai SP Flash Tool dan tidak yakin apakah ROM nya bisa digunakan di HH anda JANGAN mencentang PRELOADER & DSP_BL karena bisa mengakibatkan HH anda brick dan bisa berlanjut ke hardware recovery.
NOTE 2: Apabila tidak dibutuhkan, jangan menggunakan fungsi Format di Flash Tool karena bisa menghapus NAND Flash secara total. Gunakan fungsi ini hanya sebagai solusi "pilihan/kesempatan terakhir".
I. Flashing dengan SP Flash Tool
Spoiler for A. Complete ROM:
------------------------------------------------------------------------------------------
Download & Install driver MTK DA VCOM(A.1, B.I)
Download dan unpack SP Flash Tool (A.3)
NOTE:Jangan menyambungkan HH ke PC sebelum langkah 7.
------------------------------------------------------------------------------------------
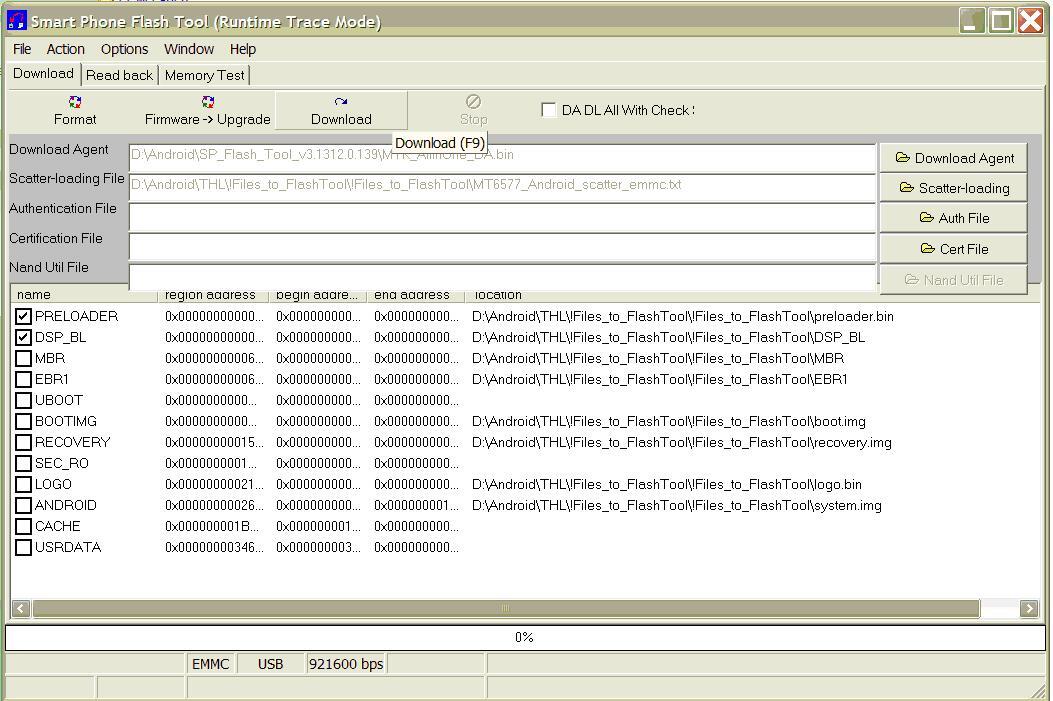
1. Buka SP Flash Tool – dobel klik pada Flash_tool.exe pada folder Flash tool
2. Klik tombol Scatter-loading dan arahkan ke folder ROM MT65XX_Android_scatter_emmc.txt (XX bisa berarti 73, 75, 77, 89 tergantung ROM apa yang anda miliki).
Spoiler for Img. 3:

3. Tekan Firmware -> upgrade atau Download (upgrade Firmware mengharuskan semua pilihan untuk dicentang, fungsi Download memberi kesempatan untuk nge-flash ROM secara sebagian)
4. Matikan HH
5. Lepas Batere dari HH
6. Pasang kembali Batere ke HH
7. Sambungkan HH ke PC via kabel USB
8. PC akan mendeteksi HH, meng-install driver dan memulai prosedur flashing. Pertama-tama Progress-Bar akan berwarna Merah, lalu Ungu, Kuning dan terakhir Lingkaran Hijau akan muncul yang menandakan bahwa proses flashing telah selesai
Spoiler for Img. 4:
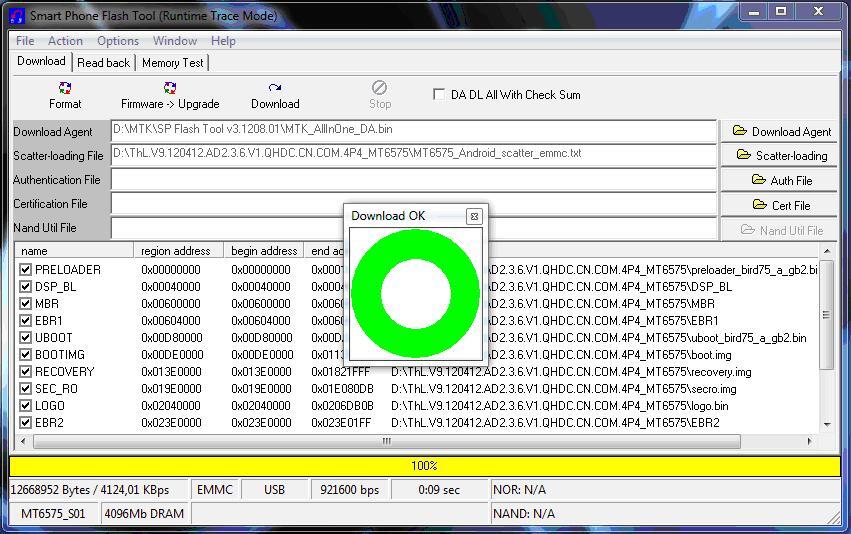
9. Cabut kabel dari PC dan Nyalakan HH anda.
Spoiler for B. Partitial Flashing:
------------------------------------------------------------------------------------------
Download & Install driver MTK DA VCOM(A.1, B.I)
Download dan unpack SP Flash Tool (A.3)
NOTE:Jangan menyambungkan HH ke PC sebelum langkah 9.
------------------------------------------------------------------------------------------
1. Buka SP Flash Tool – dobel klik pada Flash_tool.exe di folder Flash tool
2. Klik tombol Scatter-loading dan arahkan ke MT65XX_Android_scatter_emmc.txt (XX bisa berarti 73, 75, 77, 89 tergantung ROM apa yang anda miliki).
3. Centang hanya pada partition yang diinginkan saja, pilihan lainnya tidak boleh dicentang (kotak pilahnnya harus dikosongkan (contoh di bawah adalah untuk flashing partisi RECOVERY)
Spoiler for Img. 6:
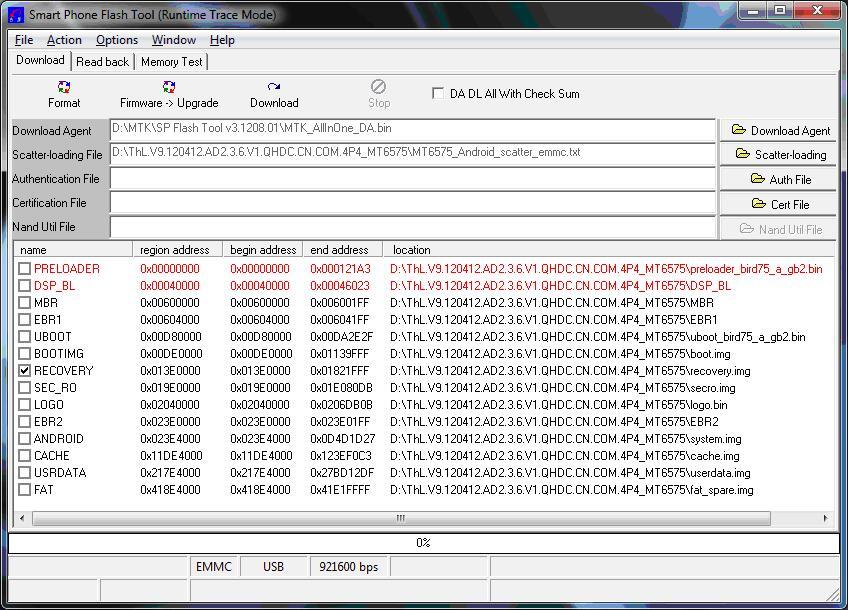
4. Tekan Download (F9)
5. Tanda peringatan (warning) akan muncul karena tidak semua partisi dipilih/dicentang. Tekan Yes
Spoiler for Img. 7:
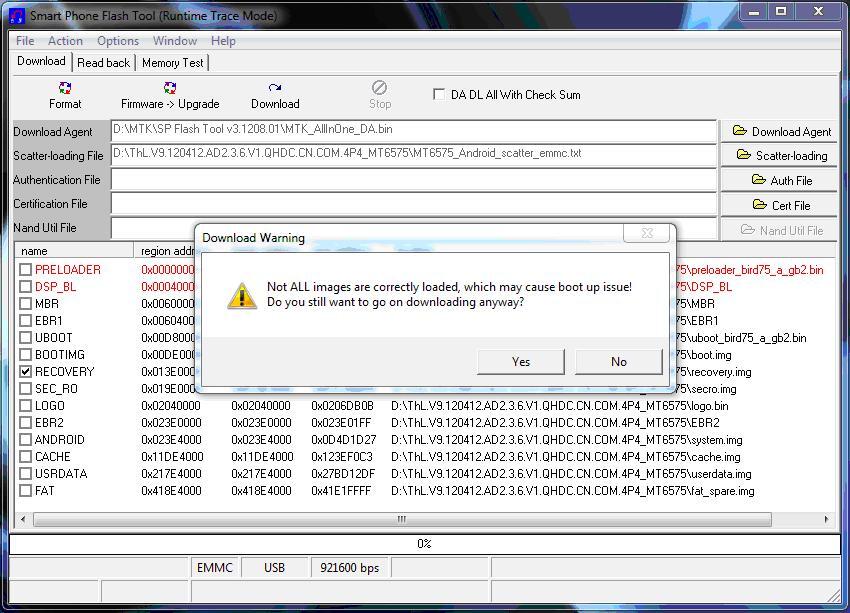
6. Matikan HH
7. Lepas Batere dari HH
8. Pasang kembali Batere ke HH
9. Sambungkan HH ke PC via kabel USB
10. PC akan mendeteksi HH, meng-install driver dan memulai prosedur flashing. Pertama-tama Progress-Bar akan berwarna Merah, lalu Kuning dan terakhir Lingkaran Hijau akan muncul yang menandakan bahwa proses flashing telah selesai
--------------------------------------------------------------------------------------------------
II. Flashing dengan CWM
Spoiler for A. ROM Baru:
---------------------------------------------------------------------------------------------------
HH anda harus sudah di-flash dengan custom Recovery (CWM) untuk bisa masuk ke menu di bawah ini.
Cara ber-Navigasi di CWM:
UP– tombol “Vol +”
DOWN – tombol “Vol -”
Confirm – tombol “Power”
---------------------------------------------------------------------------------------------------
1. Matikan HH
2. Sambungkan HH ke PC via USB
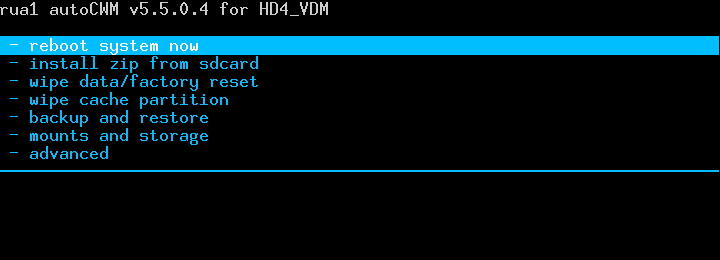
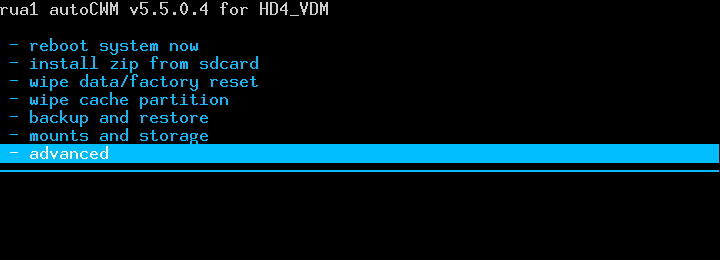
3. Tekan tombol “Vol +” dan “POWER” secara bersamaan dan tahan keduanya sampai masuk ke menu berikut ini (Sebagai alternatif pilihannya, gunakan aplikasi Mobile Uncle - lalu masuk ke Recovery):
Spoiler for Img. 1:
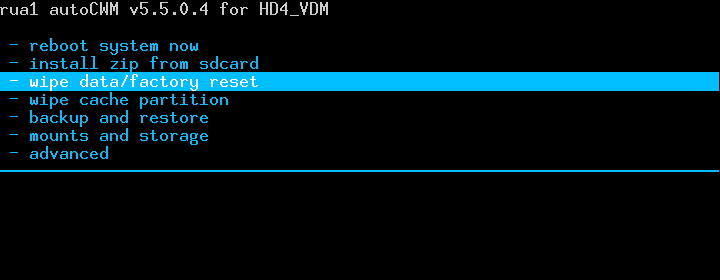
4. Pilih Wipe data/factory reset
Spoiler for Img. 2:
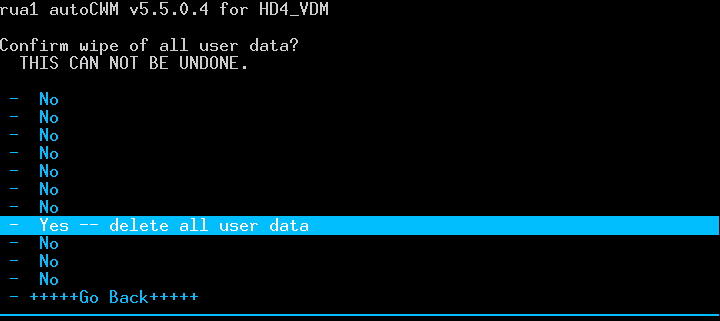
5. Confirm, pilih Yes, Confirm, lalu Go Back
Spoiler for Img. 3:
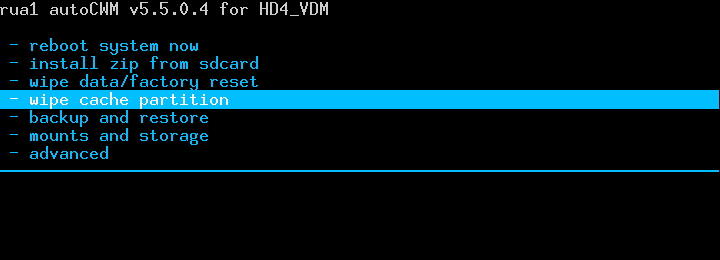
6. Pilih Wipe cache partition
Spoiler for Img. 4:
7. Confirm, pilih Yes, Confirm, lalu Go Back
Spoiler for Img. 5:

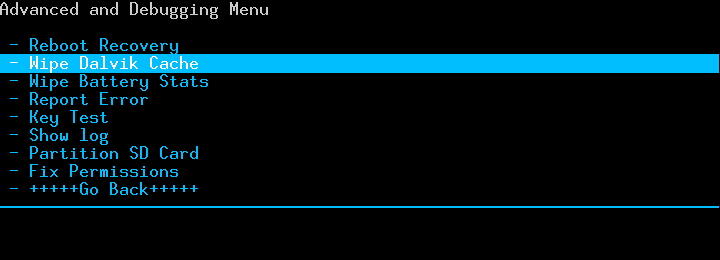
8. Pilih Advanced
Spoiler for Img. 6:
9. Confirm, pilih Wipe Dalvik Cache, Confirm, lalu Go Back
Spoiler for Img. 7:
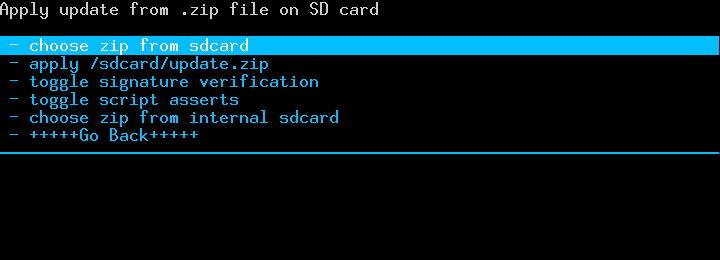
10. Pilih Install zip from sdcard, lalu Confirm
Spoiler for Img. 8:

11. Choose zip from sdcard, Confirm, lalu pilih nama file target ZIP, Confirm
Spoiler for Img. 9:
12. Pilih Yes, Confirm (sample)
Spoiler for Img. 10:

Spoiler for B. Patches, Fixes etc.:
---------------------------------------------------------------------------------------------------
HH anda harus sudah di-flash dengan custom Recovery (CWM) untuk bisa masuk ke menu di bawah ini.
Cara ber-Navigasi di CWM:
UP– tombol “Vol +”
DOWN – tombol “Vol -”
Confirm – tombol “Power”
---------------------------------------------------------------------------------------------------
1. Matikan HH
2. Sambungkan HH ke PC via USB
3. Tekan tombol “Vol +” dan “POWER” secara bersamaan dan tahan keduanya sampai masuk ke menu berikut ini (Sebagai alternatif pilihannya, gunakan aplikasi Mobile Uncle - lalu masuk ke Recovery):
Spoiler for Img. 1:
4. Pilih Install zip from sdcard, lalu Confirm
Spoiler for Img. 8:
5. Choose zip from sdcard, Confirm, lalu pilih nama file target ZIP, Confirm
Spoiler for Img. 9:
6. Pilih Yes, Confirm (sample)
Spoiler for Img. 10:
D. BACKUP & RESTORE
Spoiler for Backup:
I. CWM BACKUP & RESTORE
Spoiler for CWM backup & Restore:
---------------------------------------------------------------------------------------------------
NOTE 1: HH anda harus sudah di-flash dengan custom Recovery (CWM) untuk bisa masuk ke menu di bawah ini.
NOTE 2: External SD card must be installed and have enough free space (1GB+)
NOTE 3: For restore must use exact same external SD card that was used for backup
Cara ber-Navigasi di CWM:
UP – tombol “Vol +”
DOWN – tombol “Vol -”
Confirm – tombol “Power”
---------------------------------------------------------------------------------------------------
A. BACKUP
Spoiler for Backup:
1. Matikan HH
2. Sambungkan HH ke PC via USB
3. Tekan tombol “Vol +” dan “POWER” secara bersamaan dan tahan keduanya sampai masuk ke menu berikut ini (Sebagai alternatif pilihannya, gunakan aplikasi Mobile Uncle - lalu masuk ke Recovery):
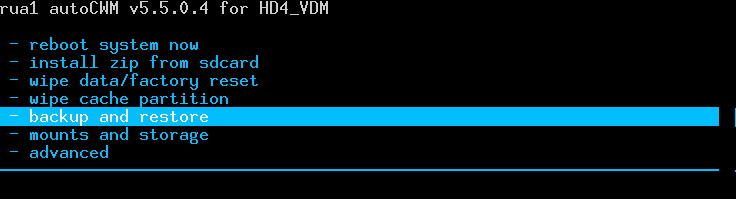
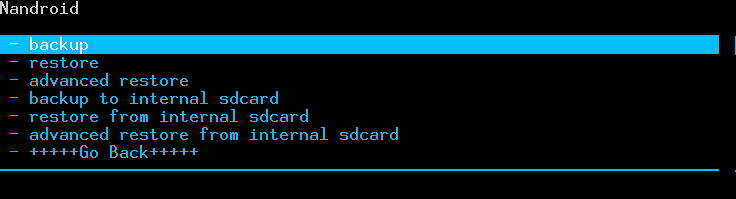
4. Pilih Backup and recovery
5. Pilih Backup
6. Go back, Reboot system now.
2. Sambungkan HH ke PC via USB
3. Tekan tombol “Vol +” dan “POWER” secara bersamaan dan tahan keduanya sampai masuk ke menu berikut ini (Sebagai alternatif pilihannya, gunakan aplikasi Mobile Uncle - lalu masuk ke Recovery):
Spoiler for Img. 1:
4. Pilih Backup and recovery
Spoiler for Img. 2:
5. Pilih Backup
Spoiler for Img. 3:
6. Go back, Reboot system now.
B. RESTORE
Spoiler for Restore:
1. Matikan HH
2. Sambungkan HH ke PC via USB
3. Tekan tombol “Vol +” dan “POWER” secara bersamaan dan tahan keduanya sampai masuk ke menu berikut ini (Sebagai alternatif pilihannya, gunakan aplikasi Mobile Uncle - lalu masuk ke Recovery):
Spoiler for Img. 1:
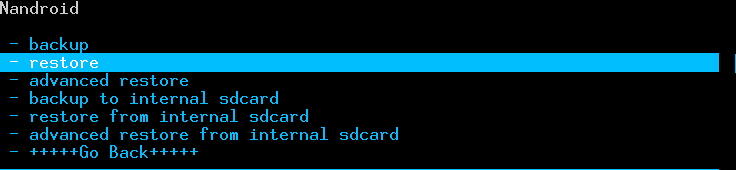
4. Pilih Backup and recovery
Spoiler for Img. 2:
5. Pilih Restore
Spoiler for Img. 3:
6. Choose desired backup to restore as per date/time, Confirm
Spoiler for Img. 4:
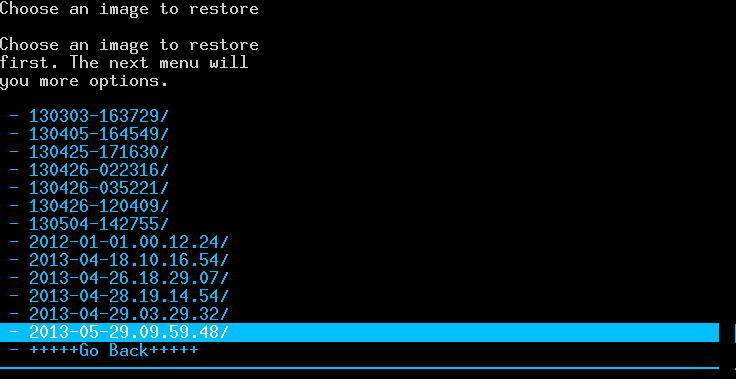
7. Wait until Restore process complete & Reboot device.
E. HARDWARE RECOVERY ("BRICK" RECOVERY)
Spoiler for Unbricking guide:
In most cases (but not always) MTK65XX devices can be recovered from complete malfunction when device doesn't respond on any buttons combinations, can not be powered ON, doesn't recognized by PC - this condition sometimes called "BRICK".
NOTE:Do not mix "BRICK" condition with Boot Loop or screen flickering or black out etc. these conditions are mostly related to System or Boot partitions and can be fixed with flashing Stock ROM via SP flash tool (C.I.A). Typical "BRICK" condition identified when PC doesn't recognize device.
In order to recover "BRICK" have to use Test Point.
Test Point (TP) is the point on the Phone Circuit Board (PCB) which is granting access to the internal loader integrated into the chip. Activating internal loader you can flash Preloader partition (using SP Flash Tool) which is part of the original phone firmware.
Before phone disassembling and searching for TP try option:
Press and hold Camera, Vol Down, Vol Up, Power and all the possible buttons combinations, even all buttons at the same time and then connect the cable to the PC.
If “Buttons hold” method doesn't work and PC still can't recognize device proceed with TP identification.
1. Make sure DA VCOM drivers are installed (A.1, B.1)
2. Make sure your PC audio is working loud enough (to identify if device is recognized)
3. Download Stock ROM (firmware) applicable to your device. Must be SP Flash Tool version.
4. Run SP Flash Tool – Load Scatter File – Put checks only on PRELOADER & DSP_BL (if available) – Press F9 or Download
Spoiler for SPFT prepare:
5. Prepare wire “jumper”
Spoiler for Wire sample:
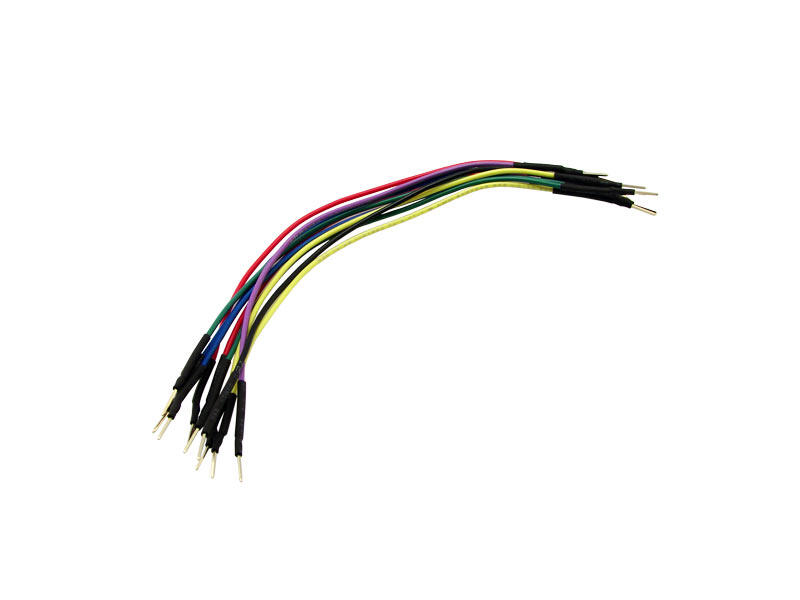
NOTE:For safety reason it is better to use a Resistor from 100-1000 Ohm soldered between “jumper” ends, otherwise there is chance to burn PCB components
6. Disassemble phone until get access to PCB
7. Take a look for a small circular (sometimes square) areas 1-2mm in a diameter. They are clear and sometimes (but not always) has marking like Rx,Tx,GND,Vcc,Vcharge etc. If point has marking like KCOLO, COLO, KOLO or CO most probably you got TP at once. (Do not use Vcc, Vcharge or any points which have 4+ volts)
NOTE: Sometimes TP can be covered by lacquer or thin protective film, Identification sticker under battery or even PCB bus cable. so in order to get access have carefully remove them, just enough to touch by wire "jumper".
8. Short suspected TP to the phone Ground using wire “jumper”. Ground point can be identified as GND marking, also can use PCB Battery Negative pin (Battery “-“) or even screw holes.
9. Connect phone to PC via USB cable
NOTE: Connecting USB cable you will apply electrical power to your PCB so make sure you are not shorting other parts of PCB
10. If you short correct point PC will sound new device connection and SP Flash Tool will start Loading PRELOADER and DSP_BL (if available).
NOTE: You have to hold wire “jumper” shorted until flashing is complete.
11. If PC doesn’t recognize device and no action in SP Flash Tool, repeat steps 7-9 with another point.
12. After successful PRELOADER & DSP_BL partitions loading you can flash device with all partitions as usual without wire “jumper” (C.I.A).
Test Point Samples: See Post 3.
Diubah oleh androidmedia 11-07-2013 01:39
0
667.1K
1.5K
Komentar yang asik ya
Mari bergabung, dapatkan informasi dan teman baru!
Android
29.6KThread•17.5KAnggota
Tampilkan semua post
User telah dihapus
#915
[Tutorial] MT65xx TWRP Porting

Unofficial TeamWin Recovery Project for MTK65xx-Based Phone Porting Tutorial
Quote:
Quote:
Quote:
Quote:
Original Posted By Sebelum Lanjut
Quote:
Original Posted By Ukuran PartisiMari pastikan berapa ukuran partisi recovery. Caranya:
1. Backup hape pake MTK Droid Tools (MDT)
2. Buka file scatter, pake Notepad++
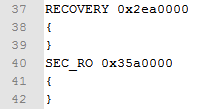
3. Cari bagian RECOVERYdan SEC_RO
![kaskus-image]()
4. Buka kalkulator, masuk mode programmer, sesuaikan dengan gambar dibawah:
![kaskus-image]()
5. Lakukan kalkulasi berikut:
6. Hasilnya bisa bervariasi, tapi biasanya hasilnya:
Kalo hasilnya 6MB, ada kerjaan ekstra, yaitu kompresi gambar dan penghilangan fitur TWRPsehingga file nya tidak melebihi ukuran fisik partisi
1. Backup hape pake MTK Droid Tools (MDT)
2. Buka file scatter, pake Notepad++
3. Cari bagian RECOVERYdan SEC_RO
Spoiler for recovery-secro:
4. Buka kalkulator, masuk mode programmer, sesuaikan dengan gambar dibawah:
Spoiler for kalkulator:
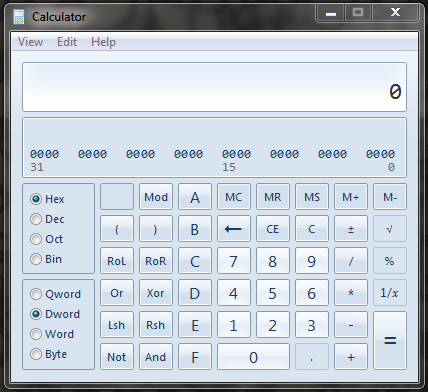
5. Lakukan kalkulasi berikut:
Code:
SEC_RO [B]-[/B] RECOVERY

Contoh: 35a0000 - 2ea0000
6. Hasilnya bisa bervariasi, tapi biasanya hasilnya:
Code:
70 0000 -> 7 MB

60 0000 -> 6 MB
Kalo hasilnya 6MB, ada kerjaan ekstra, yaitu kompresi gambar dan penghilangan fitur TWRPsehingga file nya tidak melebihi ukuran fisik partisi
Quote:
Original Posted By eMMC / MTDPaling gampang? liat log.txtdari MTK Droid Tools, setelah backup 
cari bagian ini (ada dibagian awal-awal log)
Kalo ga diakhiri /dev/block/mmcblk, ane saranin ga lanjut dulu
cari bagian ini (ada dibagian awal-awal log)
Spoiler for cari:
Kalo ga diakhiri /dev/block/mmcblk, ane saranin ga lanjut dulu
Quote:
Quote:
Original Posted By Step by Step1. Ekstrak Binary Base
Ga boleh ke dalam folder yang ada spasi di namanya. Misal:
2. Ekstrak file TWRP
3. Masukkan file TWRP.7zdan res.7z ke dalam folder bin yang ada di folder michfood-Port-TWRP-V2.5.0.0-Javum hasil ekstrak dari Binary Base (folder bin nya hidden)
4. Masuk folder backup MDT, copy file recovery.img
5. Masuk ke michfood-Port-TWRP-V2.5.0.0-Javum, paste file recovery.img
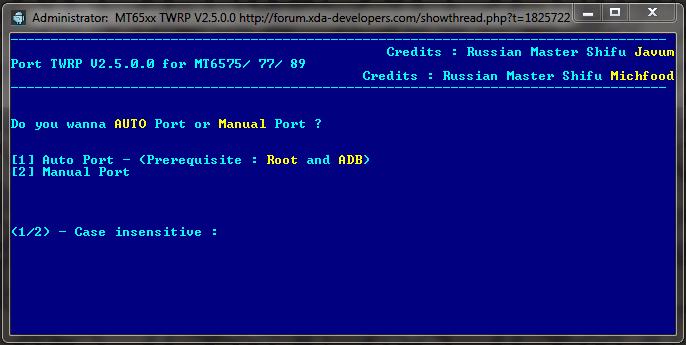
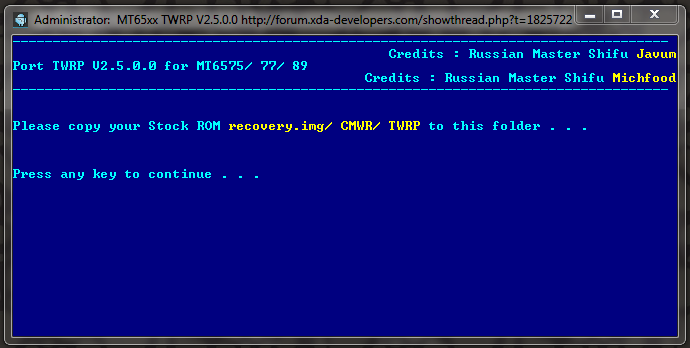
6. Buka file 2500.exe
7. Pilih Manual Porting
![kaskus-image]()
8. Pastikan file recovery.imgsudah ada di dalam satu folder bersama dengan file 2500.exe, kalau sudah, tekan enter
![kaskus-image]()
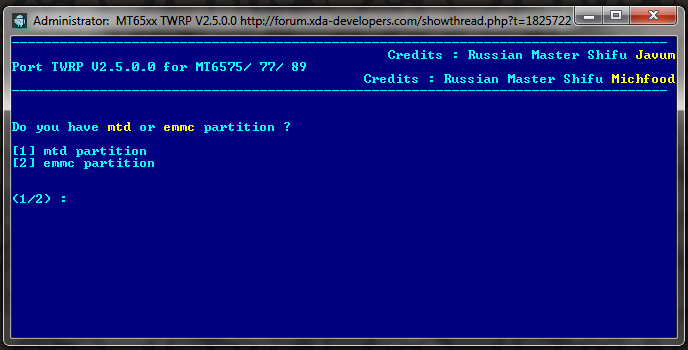
9. Pilih sistem partisi ponsel: emmc
![kaskus-image]()
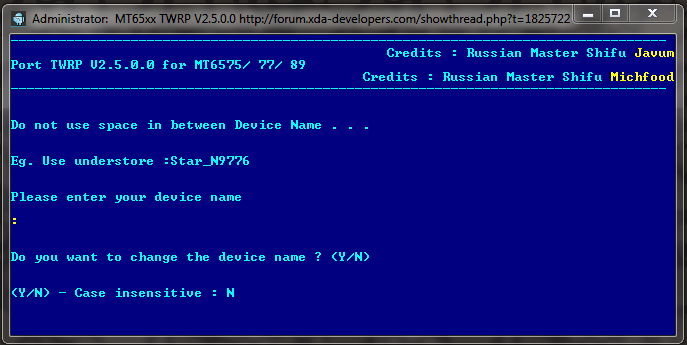
10. Kosongkan nama ponsel (Tekan enter, lalu konfirmasi N)
![kaskus-image]()
10. Minimize jendela porting
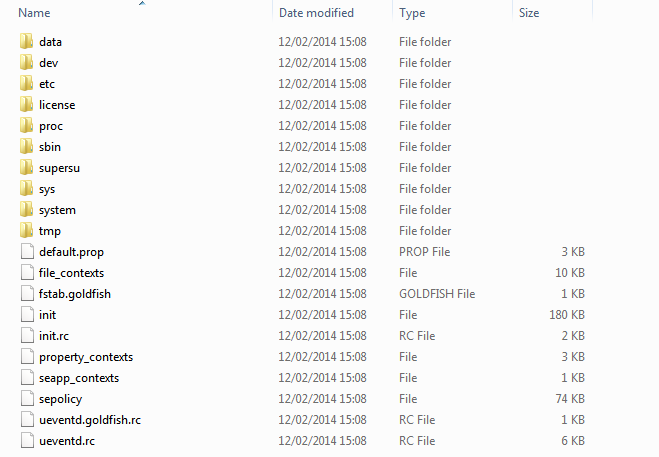
11. Masuk folder recoveryyang ada di dalam folder michfood-Port-TWRP-V2.5.0.0-Javum
12. Masuk ke folder rmdisk
![kaskus-image]()
13. Edit bagian ini di default.prop, sesuaikan dengan build.prophape nt (pake notepad++):
14. Save file nya
15. Masuk folder etc
16. Edit recovery.fstab, sesuaikan dengan hape nt (bisa liat di log.txtMDT tadi), contoh recovery.fstab dari ane:
recovery.fstab ini harusnya bisa dipake di hampir semua hape berbasis MTK, tapi ga disarankan
Bagian yang berwarna merah, sesuaikan dengan ponsel
17. Buka kembali jendela porting yang tadi di minimize
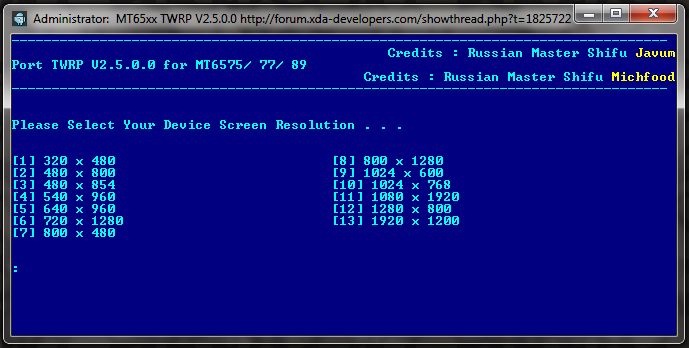
18. Pilih resolusi layar, untuk ponsel, biasanya memakai orientasi berdiri. Jadi misal: layar HD 720p, berarti 720x1280 (bukan 1280x720)
![kaskus-image]()
19. Ambil recovery.imghasil porting di folder Ported-TWRP
20. Hasilnya bisa di flash menggunakan MobileUncle MTK Tools atau SP Flash Tool yang sesuai dengan ponsel
Ga boleh ke dalam folder yang ada spasi di namanya. Misal:
Code:
C:\Porting TWRP -> [COLOR=Red][B]Ga Boleh[/B][/COLOR]

C:\Porting-TWRP -> [COLOR=Blue][B]Boleh[/B][/COLOR]
2. Ekstrak file TWRP
3. Masukkan file TWRP.7zdan res.7z ke dalam folder bin yang ada di folder michfood-Port-TWRP-V2.5.0.0-Javum hasil ekstrak dari Binary Base (folder bin nya hidden)
4. Masuk folder backup MDT, copy file recovery.img
5. Masuk ke michfood-Port-TWRP-V2.5.0.0-Javum, paste file recovery.img
6. Buka file 2500.exe
7. Pilih Manual Porting
8. Pastikan file recovery.imgsudah ada di dalam satu folder bersama dengan file 2500.exe, kalau sudah, tekan enter
9. Pilih sistem partisi ponsel: emmc
10. Kosongkan nama ponsel (Tekan enter, lalu konfirmasi N)
10. Minimize jendela porting
11. Masuk folder recoveryyang ada di dalam folder michfood-Port-TWRP-V2.5.0.0-Javum
12. Masuk ke folder rmdisk
Spoiler for isi folder rmdisk:
13. Edit bagian ini di default.prop, sesuaikan dengan build.prophape nt (pake notepad++):
Code:
ro.product.model=

ro.product.brand=

ro.product.name=

ro.product.device=

ro.product.board=

ro.board.platform=

ro.build.product=
14. Save file nya
15. Masuk folder etc
16. Edit recovery.fstab, sesuaikan dengan hape nt (bisa liat di log.txtMDT tadi), contoh recovery.fstab dari ane:
Spoiler for safe recovery.fstab:
Code:
# mount point fstype device [device2]


/boot emmc /dev/bootimg

/recovery emmc /dev/recovery

/system ext4 /emmc@android

/cache ext4 /emmc@cache

/data ext4 /emmc@usrdata

/emmc vfat /emmc@fat

/sdcard vfat /dev/block/mmcblk1p1 /dev/block/mmcblk1

/sd-ext auto /dev/block/mmcblk1p2

/nvram emmc /dev/nvram flags=display="Nvram";backup=1

/uboot emmc /dev/uboot flags=display="Uboot";backup=1

/secro emmc /dev/block/mmcblk0p[color=red][B]4[/B][/color] flags=subpartitionof=/nvram;backup=1

/logo emmc /dev/logo flags=display="Boot Splash Logo";backup=1
recovery.fstab ini harusnya bisa dipake di hampir semua hape berbasis MTK, tapi ga disarankan
Bagian yang berwarna merah, sesuaikan dengan ponsel
Spoiler for standard recovery.fstab:
Spoiler for datamedia layout recovery.fstab:
17. Buka kembali jendela porting yang tadi di minimize
18. Pilih resolusi layar, untuk ponsel, biasanya memakai orientasi berdiri. Jadi misal: layar HD 720p, berarti 720x1280 (bukan 1280x720)
19. Ambil recovery.imghasil porting di folder Ported-TWRP
20. Hasilnya bisa di flash menggunakan MobileUncle MTK Tools atau SP Flash Tool yang sesuai dengan ponsel
Quote:
Quote:
Quote:
Tutorial ini akan diperbarui di kemudian hari untuk lanjutan tips-tips porting lainnya, juga bila ada update resource
Semoga bermanfaat
")
Diubah oleh User telah dihapus 08-04-2014 13:14
0