
TS
androidmedia
MTK 65XX Platform Modifications

Thread ini didedikasikan untuk Rooting, Modification, ROM's sharing buat HH dg MTK 65XX.
NOTE: Following Procedures and Drivers are applicable to ALL MediaTek devices on MT65xx platform, i.e. MT6573, MT6575, MT6577 & MT6589
Credits to my Russian speaking community from 4PDA.ru & forum.china-iphone.ru for knowledge database and huge support materials. Mostly patches, fixes & ROMs will be re-posted from mentioned web resources.
--------------------------------------------------------------------------------------------------------
A. Tools dan Drivers yg dibutuhin:
Spoiler for Drivers & Tools:
--------------------------------------------------------------------------------------------------------
B. Instruksi untuk install Drivers
Spoiler for Drivers Installation:
--------------------------------------------------------------------------------------------------------
C. Tutorial untuk Flashing
Spoiler for Flashing:
NOTE 1:Jika anda memakai SP Flash Tool dan tidak yakin apakah ROM nya bisa digunakan di HH anda JANGAN mencentang PRELOADER & DSP_BL karena bisa mengakibatkan HH anda brick dan bisa berlanjut ke hardware recovery.
NOTE 2: Apabila tidak dibutuhkan, jangan menggunakan fungsi Format di Flash Tool karena bisa menghapus NAND Flash secara total. Gunakan fungsi ini hanya sebagai solusi "pilihan/kesempatan terakhir".
I. Flashing dengan SP Flash Tool
Spoiler for A. Complete ROM:
------------------------------------------------------------------------------------------
Download & Install driver MTK DA VCOM(A.1, B.I)
Download dan unpack SP Flash Tool (A.3)
NOTE:Jangan menyambungkan HH ke PC sebelum langkah 7.
------------------------------------------------------------------------------------------
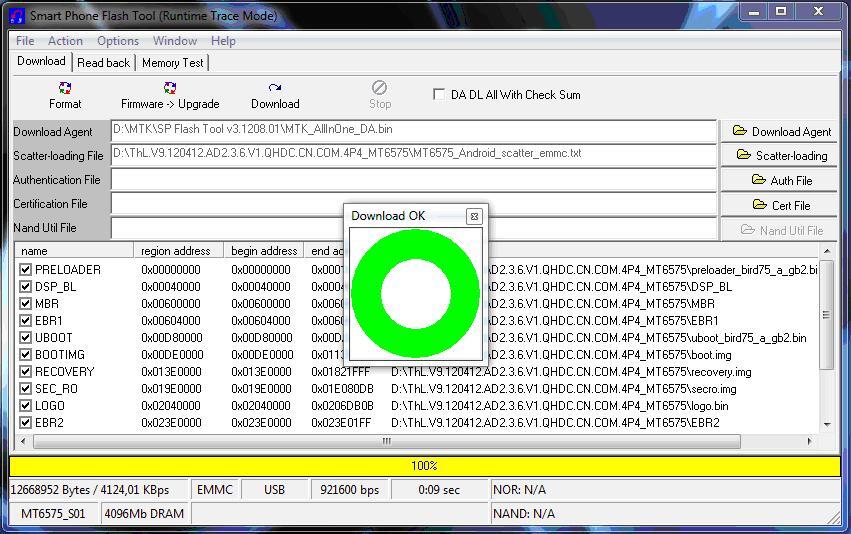
1. Buka SP Flash Tool – dobel klik pada Flash_tool.exe pada folder Flash tool
2. Klik tombol Scatter-loading dan arahkan ke folder ROM MT65XX_Android_scatter_emmc.txt (XX bisa berarti 73, 75, 77, 89 tergantung ROM apa yang anda miliki).
Spoiler for Img. 3:

3. Tekan Firmware -> upgrade atau Download (upgrade Firmware mengharuskan semua pilihan untuk dicentang, fungsi Download memberi kesempatan untuk nge-flash ROM secara sebagian)
4. Matikan HH
5. Lepas Batere dari HH
6. Pasang kembali Batere ke HH
7. Sambungkan HH ke PC via kabel USB
8. PC akan mendeteksi HH, meng-install driver dan memulai prosedur flashing. Pertama-tama Progress-Bar akan berwarna Merah, lalu Ungu, Kuning dan terakhir Lingkaran Hijau akan muncul yang menandakan bahwa proses flashing telah selesai
Spoiler for Img. 4:
9. Cabut kabel dari PC dan Nyalakan HH anda.
Spoiler for B. Partitial Flashing:
------------------------------------------------------------------------------------------
Download & Install driver MTK DA VCOM(A.1, B.I)
Download dan unpack SP Flash Tool (A.3)
NOTE:Jangan menyambungkan HH ke PC sebelum langkah 9.
------------------------------------------------------------------------------------------
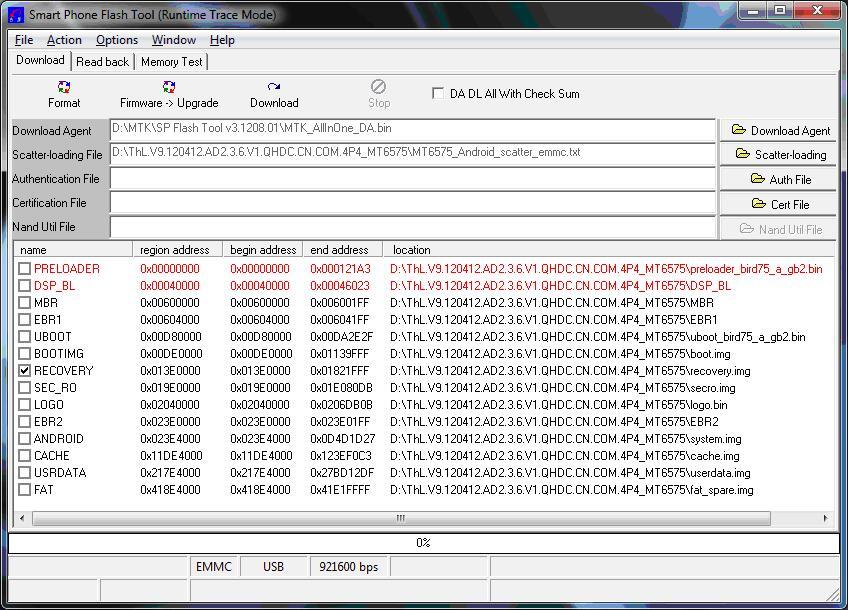
1. Buka SP Flash Tool – dobel klik pada Flash_tool.exe di folder Flash tool
2. Klik tombol Scatter-loading dan arahkan ke MT65XX_Android_scatter_emmc.txt (XX bisa berarti 73, 75, 77, 89 tergantung ROM apa yang anda miliki).
3. Centang hanya pada partition yang diinginkan saja, pilihan lainnya tidak boleh dicentang (kotak pilahnnya harus dikosongkan (contoh di bawah adalah untuk flashing partisi RECOVERY)
Spoiler for Img. 6:
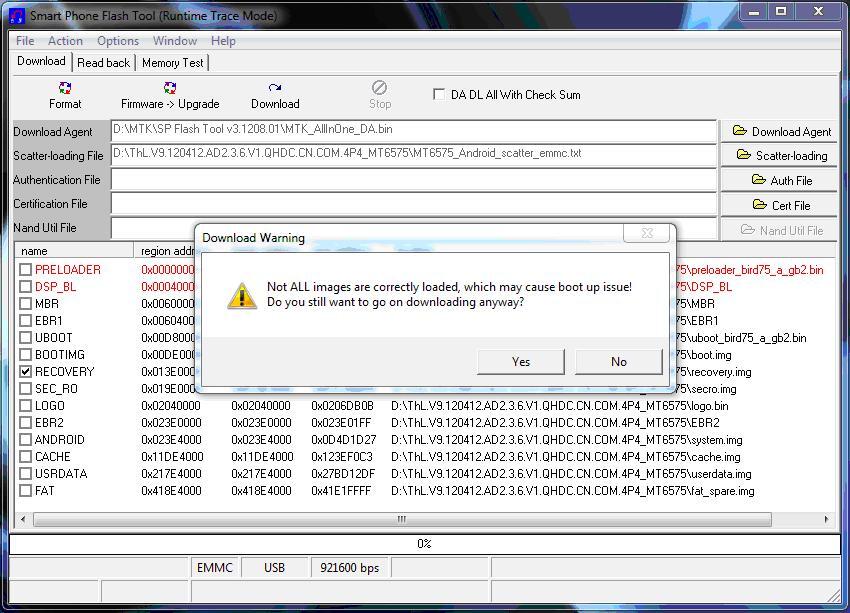
4. Tekan Download (F9)
5. Tanda peringatan (warning) akan muncul karena tidak semua partisi dipilih/dicentang. Tekan Yes
Spoiler for Img. 7:
6. Matikan HH
7. Lepas Batere dari HH
8. Pasang kembali Batere ke HH
9. Sambungkan HH ke PC via kabel USB
10. PC akan mendeteksi HH, meng-install driver dan memulai prosedur flashing. Pertama-tama Progress-Bar akan berwarna Merah, lalu Kuning dan terakhir Lingkaran Hijau akan muncul yang menandakan bahwa proses flashing telah selesai
--------------------------------------------------------------------------------------------------
II. Flashing dengan CWM
Spoiler for A. ROM Baru:
---------------------------------------------------------------------------------------------------
HH anda harus sudah di-flash dengan custom Recovery (CWM) untuk bisa masuk ke menu di bawah ini.
Cara ber-Navigasi di CWM:
UP– tombol “Vol +”
DOWN – tombol “Vol -”
Confirm – tombol “Power”
---------------------------------------------------------------------------------------------------
1. Matikan HH
2. Sambungkan HH ke PC via USB
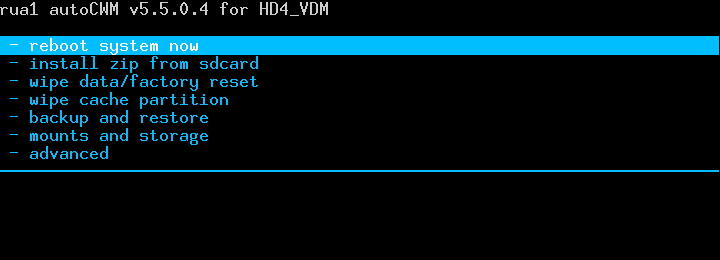
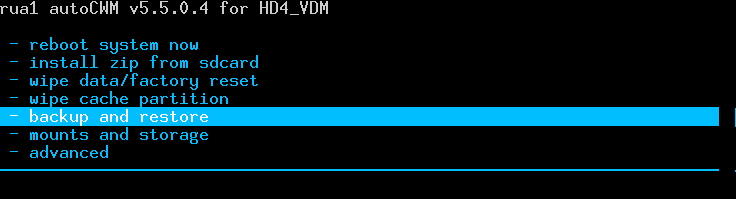
3. Tekan tombol “Vol +” dan “POWER” secara bersamaan dan tahan keduanya sampai masuk ke menu berikut ini (Sebagai alternatif pilihannya, gunakan aplikasi Mobile Uncle - lalu masuk ke Recovery):
Spoiler for Img. 1:
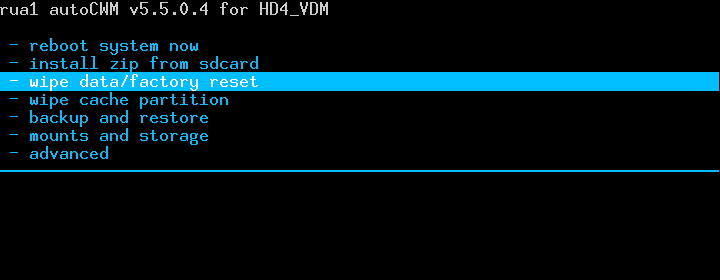
4. Pilih Wipe data/factory reset
Spoiler for Img. 2:
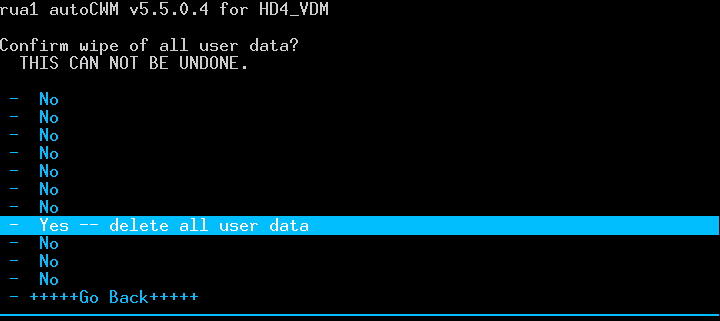
5. Confirm, pilih Yes, Confirm, lalu Go Back
Spoiler for Img. 3:
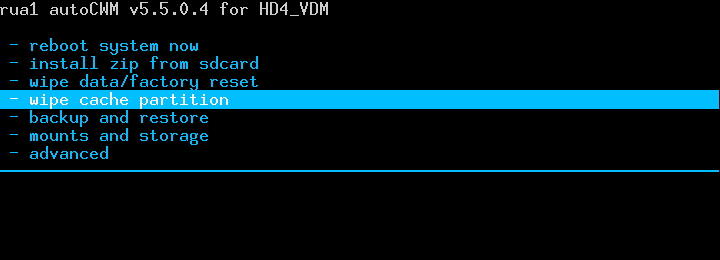
6. Pilih Wipe cache partition
Spoiler for Img. 4:
7. Confirm, pilih Yes, Confirm, lalu Go Back
Spoiler for Img. 5:

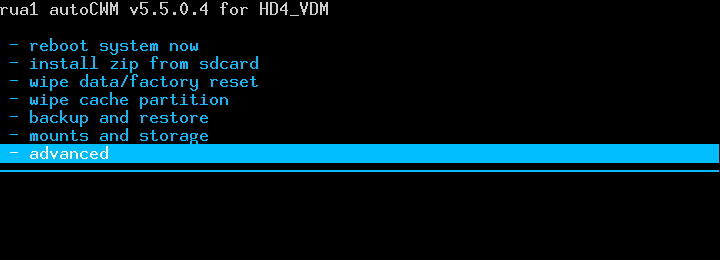
8. Pilih Advanced
Spoiler for Img. 6:
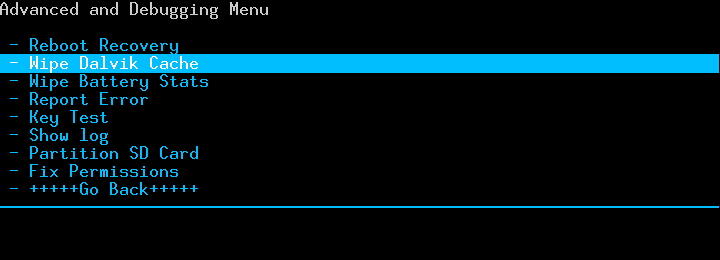
9. Confirm, pilih Wipe Dalvik Cache, Confirm, lalu Go Back
Spoiler for Img. 7:
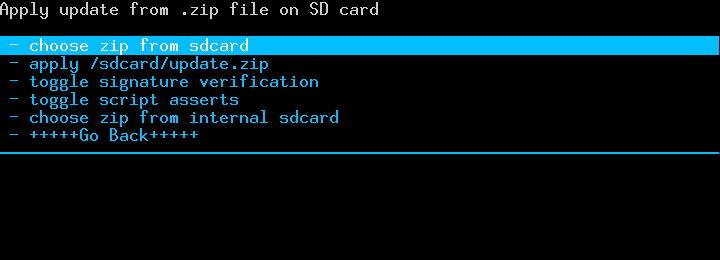
10. Pilih Install zip from sdcard, lalu Confirm
Spoiler for Img. 8:

11. Choose zip from sdcard, Confirm, lalu pilih nama file target ZIP, Confirm
Spoiler for Img. 9:
12. Pilih Yes, Confirm (sample)
Spoiler for Img. 10:

Spoiler for B. Patches, Fixes etc.:
---------------------------------------------------------------------------------------------------
HH anda harus sudah di-flash dengan custom Recovery (CWM) untuk bisa masuk ke menu di bawah ini.
Cara ber-Navigasi di CWM:
UP– tombol “Vol +”
DOWN – tombol “Vol -”
Confirm – tombol “Power”
---------------------------------------------------------------------------------------------------
1. Matikan HH
2. Sambungkan HH ke PC via USB
3. Tekan tombol “Vol +” dan “POWER” secara bersamaan dan tahan keduanya sampai masuk ke menu berikut ini (Sebagai alternatif pilihannya, gunakan aplikasi Mobile Uncle - lalu masuk ke Recovery):
Spoiler for Img. 1:
4. Pilih Install zip from sdcard, lalu Confirm
Spoiler for Img. 8:
5. Choose zip from sdcard, Confirm, lalu pilih nama file target ZIP, Confirm
Spoiler for Img. 9:
6. Pilih Yes, Confirm (sample)
Spoiler for Img. 10:
D. BACKUP & RESTORE
Spoiler for Backup:
I. CWM BACKUP & RESTORE
Spoiler for CWM backup & Restore:
---------------------------------------------------------------------------------------------------
NOTE 1: HH anda harus sudah di-flash dengan custom Recovery (CWM) untuk bisa masuk ke menu di bawah ini.
NOTE 2: External SD card must be installed and have enough free space (1GB+)
NOTE 3: For restore must use exact same external SD card that was used for backup
Cara ber-Navigasi di CWM:
UP – tombol “Vol +”
DOWN – tombol “Vol -”
Confirm – tombol “Power”
---------------------------------------------------------------------------------------------------
A. BACKUP
Spoiler for Backup:
1. Matikan HH
2. Sambungkan HH ke PC via USB
3. Tekan tombol “Vol +” dan “POWER” secara bersamaan dan tahan keduanya sampai masuk ke menu berikut ini (Sebagai alternatif pilihannya, gunakan aplikasi Mobile Uncle - lalu masuk ke Recovery):
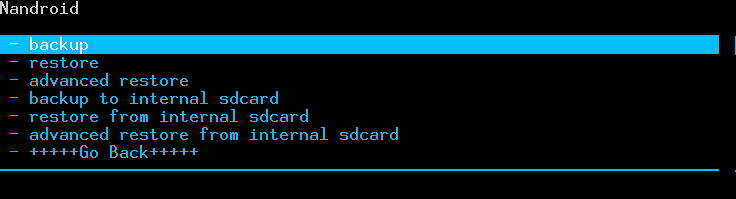
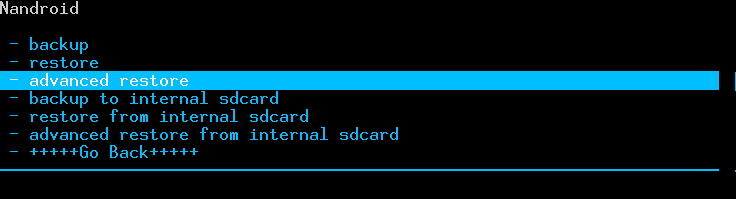
4. Pilih Backup and recovery

5. Pilih Backup
6. Go back, Reboot system now.
2. Sambungkan HH ke PC via USB
3. Tekan tombol “Vol +” dan “POWER” secara bersamaan dan tahan keduanya sampai masuk ke menu berikut ini (Sebagai alternatif pilihannya, gunakan aplikasi Mobile Uncle - lalu masuk ke Recovery):
Spoiler for Img. 1:
4. Pilih Backup and recovery
Spoiler for Img. 2:
5. Pilih Backup
Spoiler for Img. 3:
6. Go back, Reboot system now.
B. RESTORE
Spoiler for Restore:
1. Matikan HH
2. Sambungkan HH ke PC via USB
3. Tekan tombol “Vol +” dan “POWER” secara bersamaan dan tahan keduanya sampai masuk ke menu berikut ini (Sebagai alternatif pilihannya, gunakan aplikasi Mobile Uncle - lalu masuk ke Recovery):
Spoiler for Img. 1:
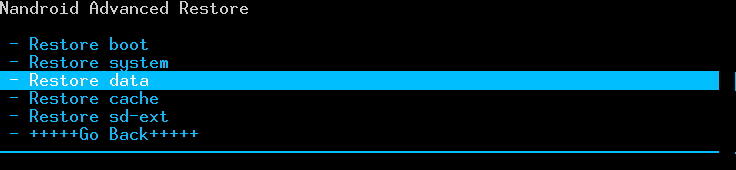
4. Pilih Backup and recovery
Spoiler for Img. 2:
5. Pilih Restore
Spoiler for Img. 3:
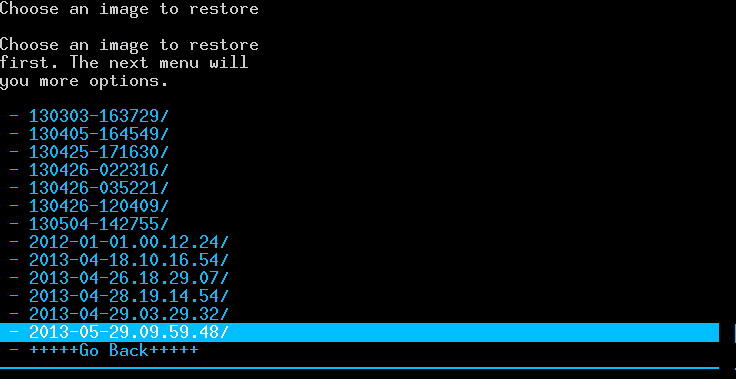
6. Choose desired backup to restore as per date/time, Confirm
Spoiler for Img. 4:

7. Wait until Restore process complete & Reboot device.
E. HARDWARE RECOVERY ("BRICK" RECOVERY)
Spoiler for Unbricking guide:
In most cases (but not always) MTK65XX devices can be recovered from complete malfunction when device doesn't respond on any buttons combinations, can not be powered ON, doesn't recognized by PC - this condition sometimes called "BRICK".
NOTE:Do not mix "BRICK" condition with Boot Loop or screen flickering or black out etc. these conditions are mostly related to System or Boot partitions and can be fixed with flashing Stock ROM via SP flash tool (C.I.A). Typical "BRICK" condition identified when PC doesn't recognize device.
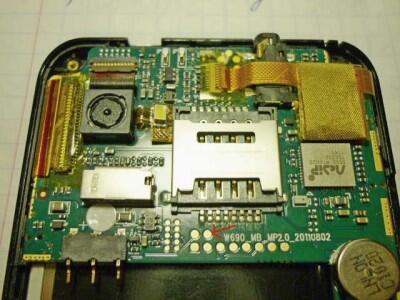
In order to recover "BRICK" have to use Test Point.
Test Point (TP) is the point on the Phone Circuit Board (PCB) which is granting access to the internal loader integrated into the chip. Activating internal loader you can flash Preloader partition (using SP Flash Tool) which is part of the original phone firmware.
Before phone disassembling and searching for TP try option:
Press and hold Camera, Vol Down, Vol Up, Power and all the possible buttons combinations, even all buttons at the same time and then connect the cable to the PC.
If “Buttons hold” method doesn't work and PC still can't recognize device proceed with TP identification.
1. Make sure DA VCOM drivers are installed (A.1, B.1)
2. Make sure your PC audio is working loud enough (to identify if device is recognized)
3. Download Stock ROM (firmware) applicable to your device. Must be SP Flash Tool version.
4. Run SP Flash Tool – Load Scatter File – Put checks only on PRELOADER & DSP_BL (if available) – Press F9 or Download
Spoiler for SPFT prepare:
5. Prepare wire “jumper”
Spoiler for Wire sample:
NOTE:For safety reason it is better to use a Resistor from 100-1000 Ohm soldered between “jumper” ends, otherwise there is chance to burn PCB components
6. Disassemble phone until get access to PCB
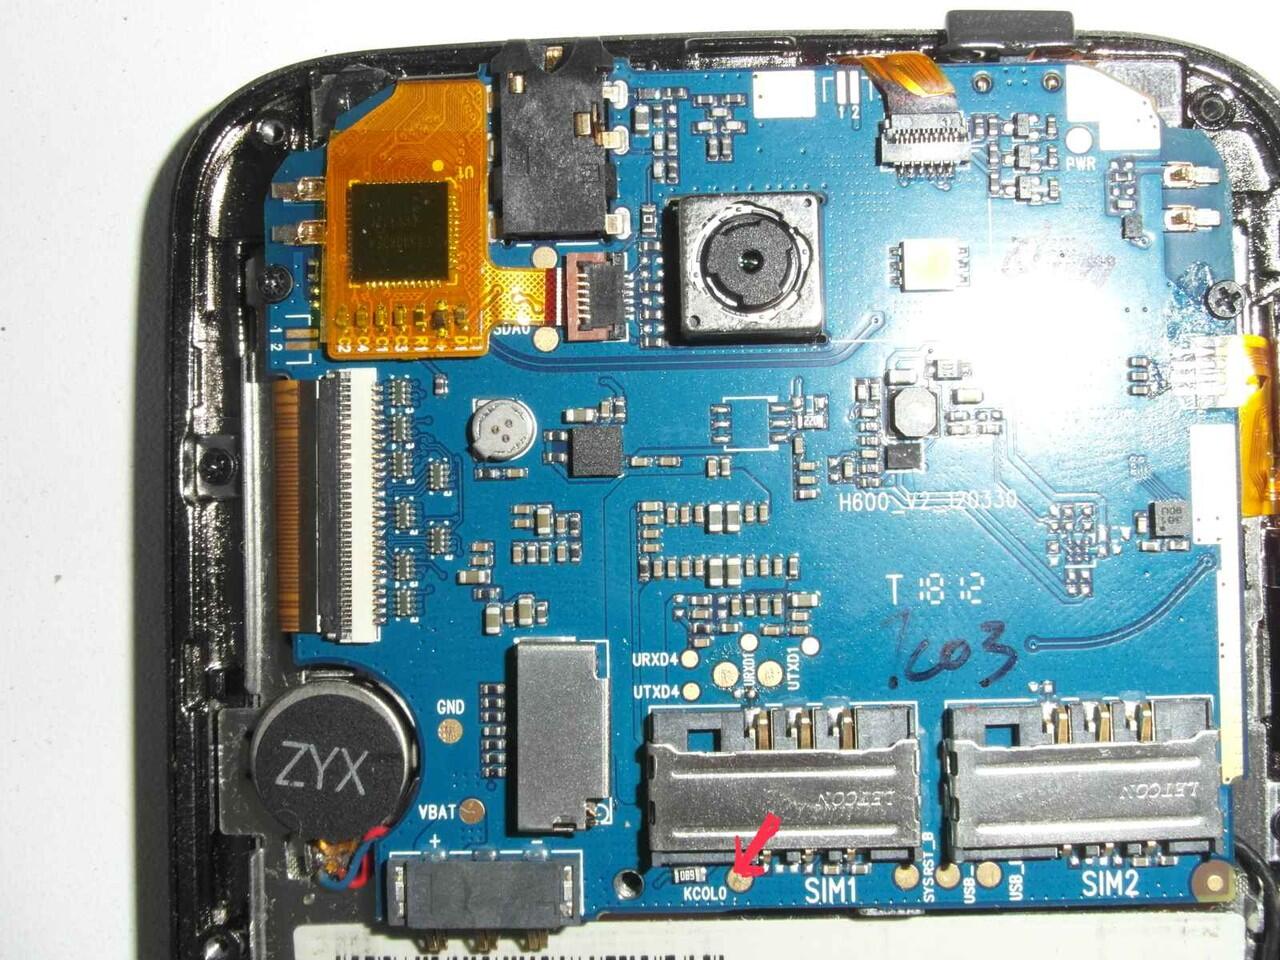
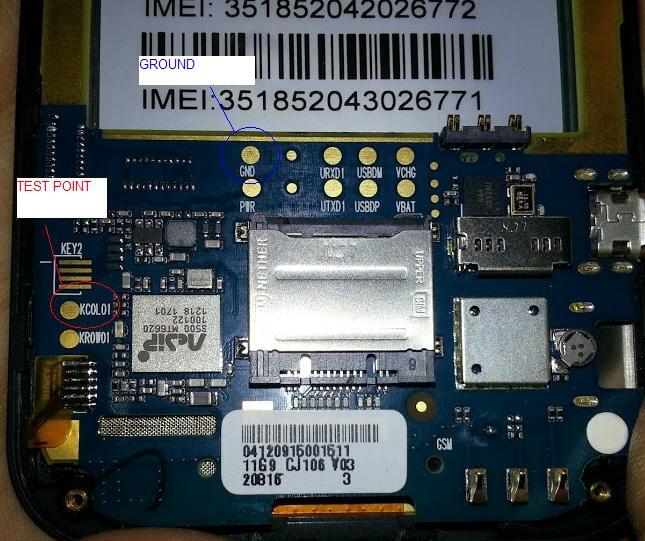
7. Take a look for a small circular (sometimes square) areas 1-2mm in a diameter. They are clear and sometimes (but not always) has marking like Rx,Tx,GND,Vcc,Vcharge etc. If point has marking like KCOLO, COLO, KOLO or CO most probably you got TP at once. (Do not use Vcc, Vcharge or any points which have 4+ volts)
NOTE: Sometimes TP can be covered by lacquer or thin protective film, Identification sticker under battery or even PCB bus cable. so in order to get access have carefully remove them, just enough to touch by wire "jumper".
8. Short suspected TP to the phone Ground using wire “jumper”. Ground point can be identified as GND marking, also can use PCB Battery Negative pin (Battery “-“) or even screw holes.
9. Connect phone to PC via USB cable
NOTE: Connecting USB cable you will apply electrical power to your PCB so make sure you are not shorting other parts of PCB
10. If you short correct point PC will sound new device connection and SP Flash Tool will start Loading PRELOADER and DSP_BL (if available).
NOTE: You have to hold wire “jumper” shorted until flashing is complete.
11. If PC doesn’t recognize device and no action in SP Flash Tool, repeat steps 7-9 with another point.
12. After successful PRELOADER & DSP_BL partitions loading you can flash device with all partitions as usual without wire “jumper” (C.I.A).
Test Point Samples: See Post 3.
Diubah oleh androidmedia 11-07-2013 01:39
0
668.6K
1.5K
Komentar yang asik ya
Mari bergabung, dapatkan informasi dan teman baru!
Android
29.7KThread•18.3KAnggota
Tampilkan semua post
TS
androidmedia
#1
ALL MTK Universal Procedure for Rooting, making CWM and Backup
If you got MTK device and do not have community and factory support, there is a chance to create CWM, Root and make Backup using following instructions.
All credits to Rua1, super-mega brain and MTKdroidTools creator.
NOTE:For MT6573 devices before connecting to PC and use SP FT often need to press and hold "Vol -" or "Vol +" or "Camera" buttons
Unified Patches, Procedures etc.
Dedicated for General Platform Mods.
--------------------------------------------------------------------------------------------------------------------------------------------------------
MEDIATEK MT6589 PLATFORM
1. ROOTING
2. INTERNAL MEMORY RE-PARTITION
1. Install CWM / TWRP (applicable to your phone)
2. Make a Backup (Post 1, D.I.A)
3. Download & Install apk: http://ge.tt/7g5YQ5i/v/0?c
4. Run Meteos MTK6589 apk
5. Choose internal memory re-partition depending on your ROM (phone storage) size.
NOTE:Please, do not choose option with more size than your ROM has. I was trying to choose 2.77Gb for ZP810 and got boot loop as Phone memory was not enough to create such size. If you want to be safe - use 2.5Gb with 4GB ROM and 5GB with 8GB ROM phones.
6. Reboot into Recovery mode (Post 1, C.II.1-3)
7. Choose Wipe data/factory reset

8. Confirm, YES

11. Choose Backup and restore

12. Choose Advanced restore

13. Choose your last backup (by date/time)

14. Choose restore data

15. Reboot your phone
(Credits to Spanish android community for APK)
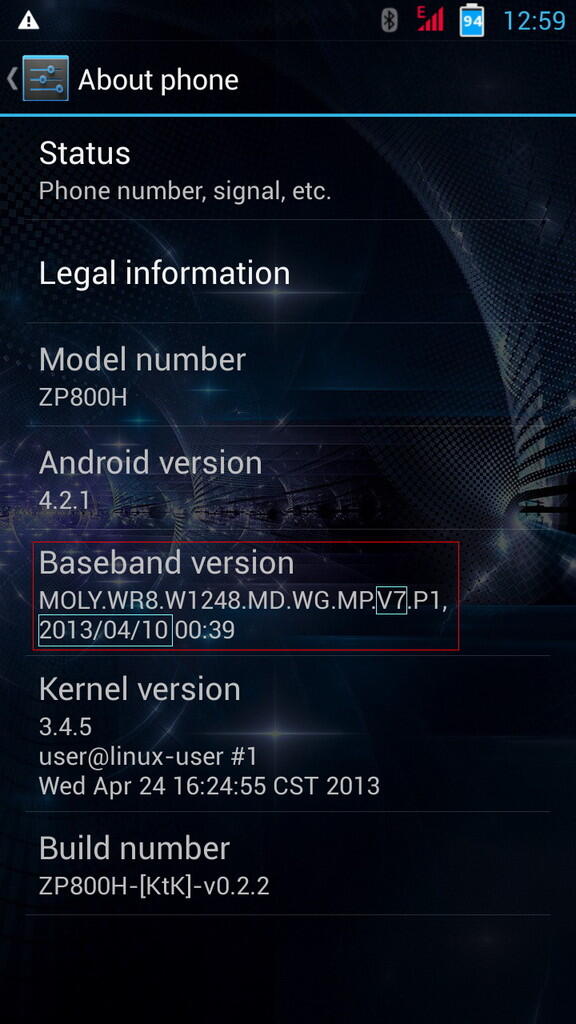
3. BASEBAND MODULE
Baseband module is responsible for GSM/CDMA network performance. Usually later revisions fix bugs and improve signal of mobile network.
Applicable NOT to ALLMT6589 devices. Reported incompability with AMOI N828 / THL W7s
To check Baseband version and date go to Settings - About

To install Baseband modules use CWM(Post 1, C.II.B)
NOTE: Make a backup (Post 1, D) before flashing Baseband module. Optionally copy /system/etc/firmware/modem.img to PC as a backup.
1. 28 March 2013
2. 10 April 2013
3. 08 May 2013
NOTE: For 08 May 2013 module there is report of GSM Network crash after data/factory reset, so avoid reset function.
HARWARE RECOVERY - TEST POINT SAMPLES
All credits to Rua1, super-mega brain and MTKdroidTools creator.
Spoiler for Procedure:
NOTE:For MT6573 devices before connecting to PC and use SP FT often need to press and hold "Vol -" or "Vol +" or "Camera" buttons
- Download & Install ADB Drivers (Post 1, A.2, B.II, B.III)
_______________________________________________________________ - Download MTK Droid Tools (MDT) (Post 1, A.4)
_______________________________________________________________ - Activate USB Debugging mode in your device (Setting – Developers Options) for Android 2.x.x (Settings-Applications-Development), Allow App installation from unknown sources (Settings-Security-Unknown Sources) or for Android 2.x.x (Settings-Applications-Unknown Sources)
_______________________________________________________________ - Run MTKdroidTools.exe on PC
_______________________________________________________________ - Switch ON device and connect it to PC via USB data cable. After short reading MDT will show your device basic information at “Phone information” tab. At the left bottom rectangle is indicating device status
Blue - device doesn’t have root shell,
Green – device has root shell,
Cyan – device is in Recovery mode,
Red – program lost connection or Fault,
White – device is not connected.
NOTE: it is recommended to connect device with good quality cable and directly to PC motherboard USB port (from behind), not from the front panel.
Spoiler for Pic. 1:
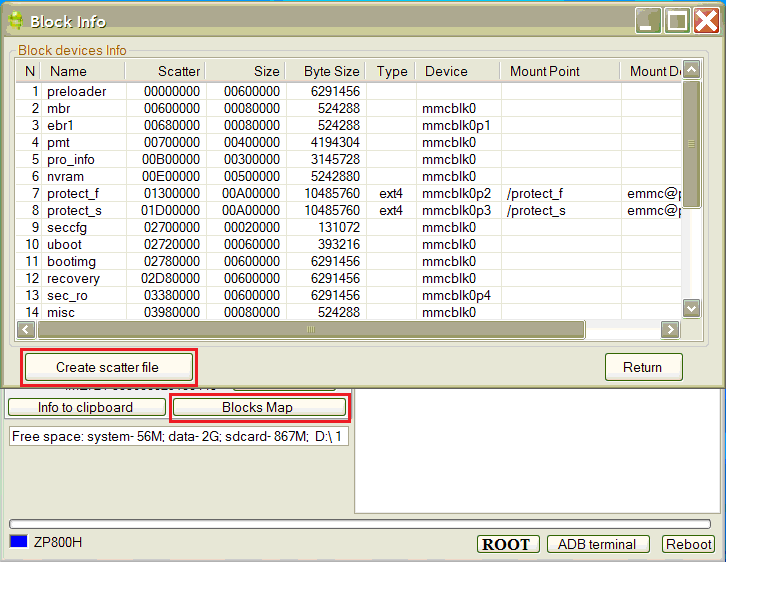
_______________________________________________________________ - Press "Blocks Map" and new window with Blocks info will appear, press “Create scatter file”, Choose folder where you want to keep Scatter file and press “save”. Press Return.
Spoiler for Pic. 2:
_______________________________________________________________ - Disconnect Device from PC, Switch it OFF, Remove Battery, Install Battery (keep it “as is” till step 15)
_______________________________________________________________ - Download & Install MTK Preloader Drivers (Post 1, A.1, B.I)
_______________________________________________________________ - Download SP FlashTool and run Flash_Tool.exe (Post 1, A.3)
NOTE: For MT6573 devices use only SP FlashTool V2 (Post 1, A.3(a))
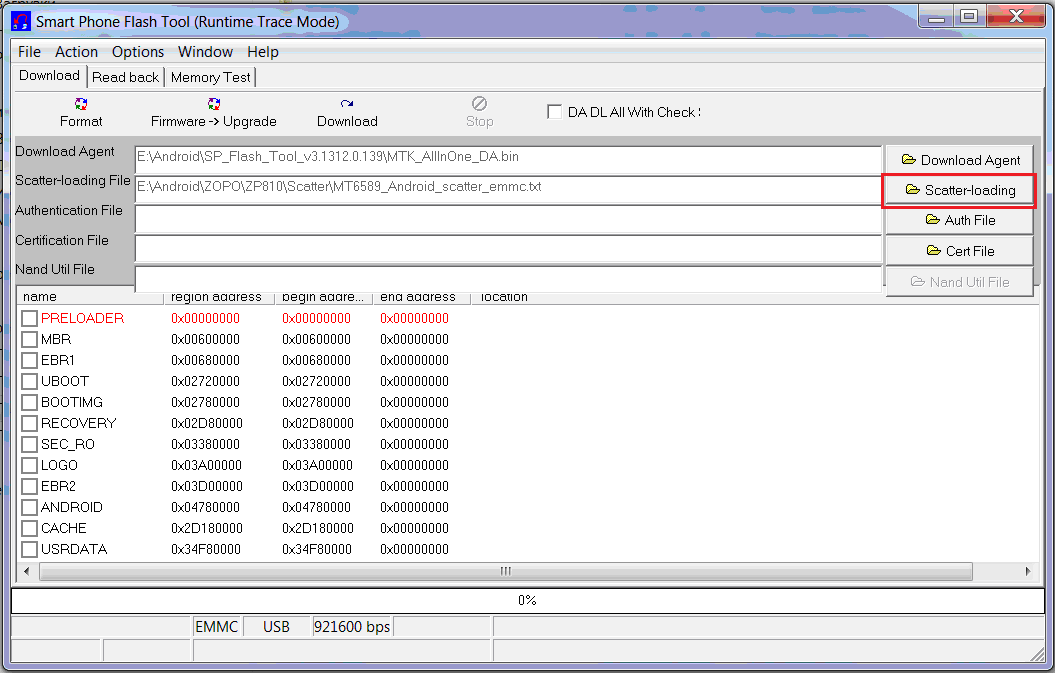
_______________________________________________________________ - Press Scatter-loading and open Scatter file created in step 6
Spoiler for Pic. 3:
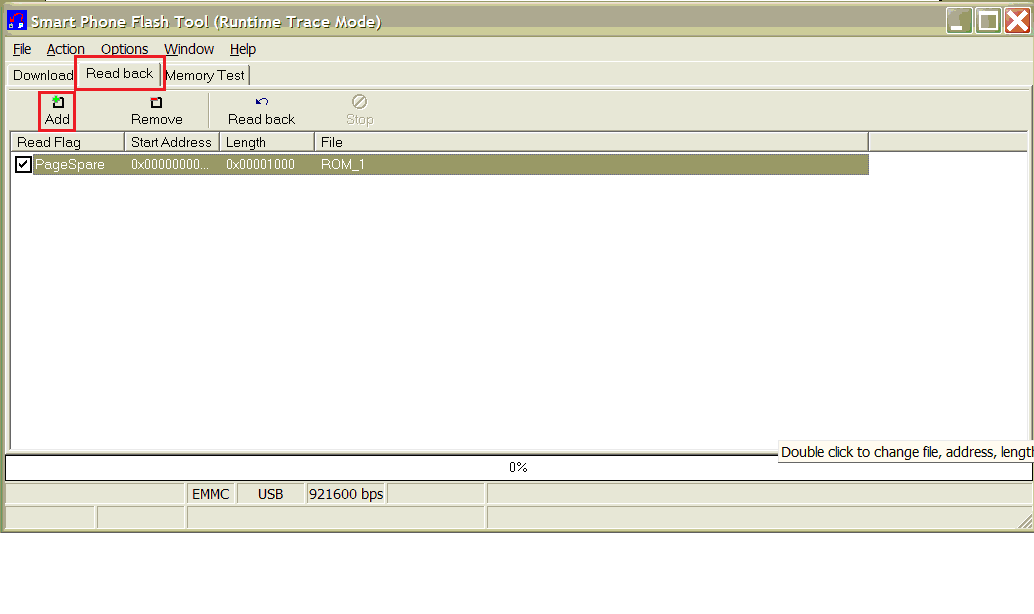
_______________________________________________________________ - Go to “Read Back” tab. If PageSpare line with address codes is already exist Go To Step 12, otherwise press “Add”
Spoiler for Pic. 4:
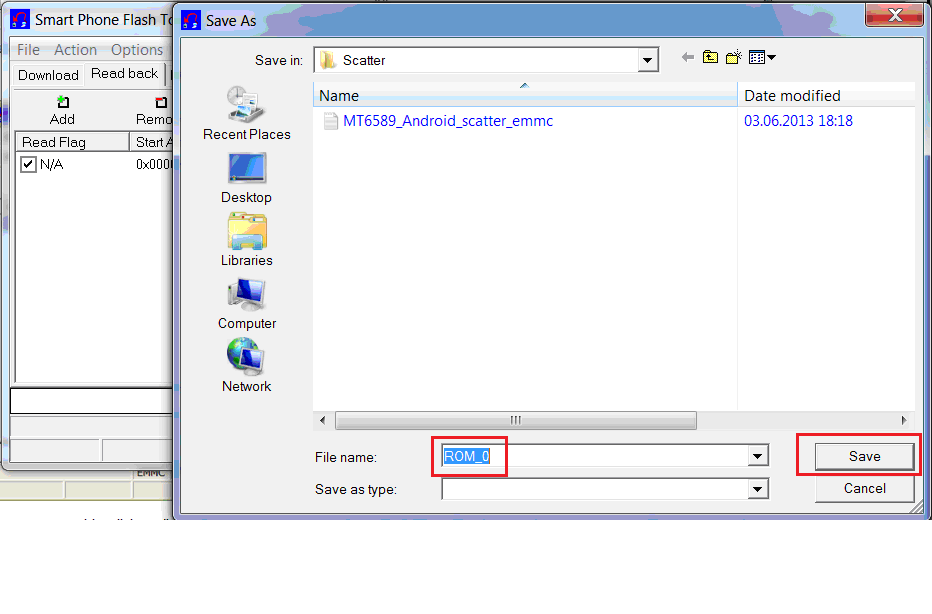
_______________________________________________________________ - Double Click on “0x000000” under Start Address and choose folder with ROM_X file. Do not change read back file name – it should have “ROM_” prefix i.e. ROM_0, ROM_1 etc. Then press “Save”.
Spoiler for Pic. 5:
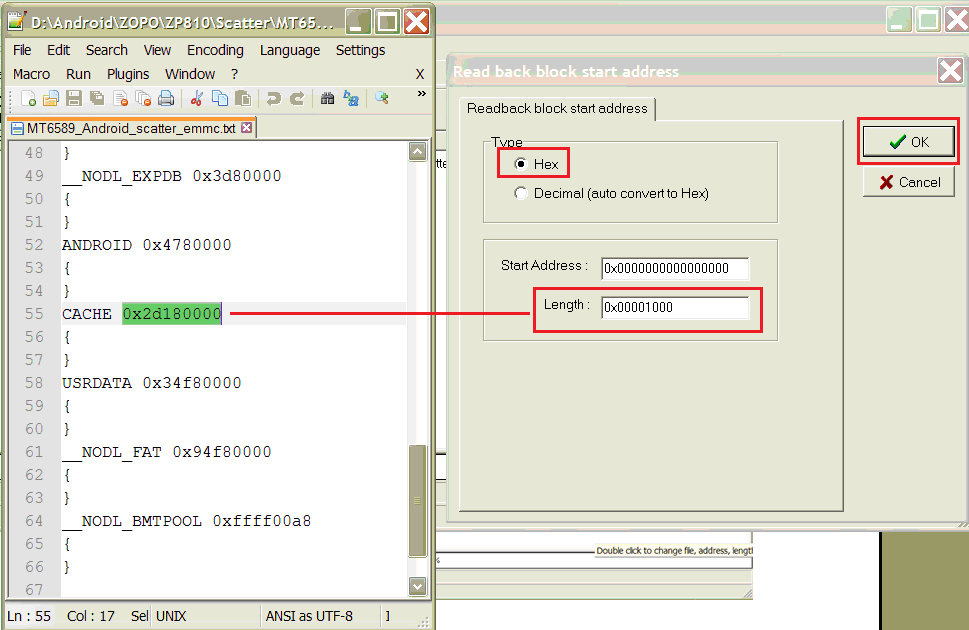
_______________________________________________________________ - For MT6575, 77, 89 devices just after pressing save button another window with “Readback block start address” tab will appear. Leave radio button choice on Hex. Put Start address code as 0x000000. Open Scatter file created in step 6 with Text Editor, NotePad++ (strongly recommended) and copy Address code next to CACHE line and paste it in Lenth field. Press Ok.
Spoiler for Pic. 6:
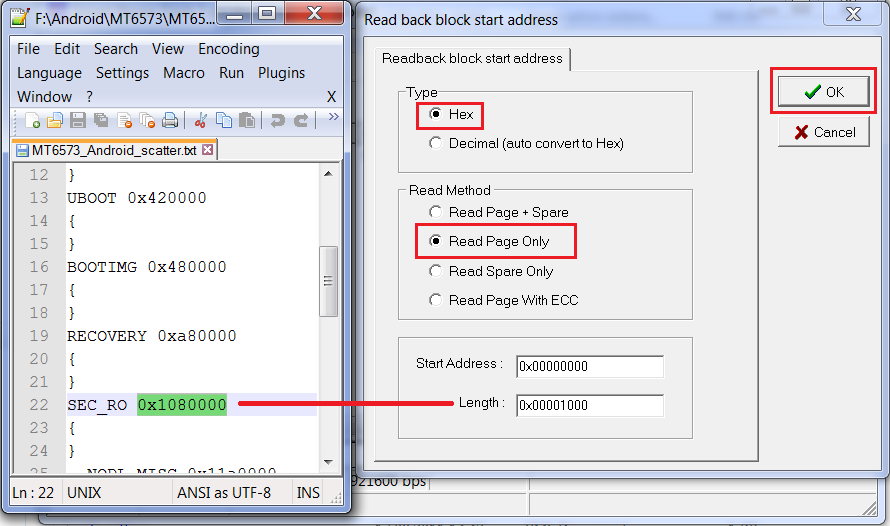
13(a) For MTK6573and some MT6575 devices with yaffs2 file system (can see which file system is installed in step 6 column "Type") should not choose CACHE address as it has no point due to some restrictions, so have to copy another address such as SEC_RO. Additionally Choose “Read Page only” at “Read Method”.
Spoiler for Pic. 7:
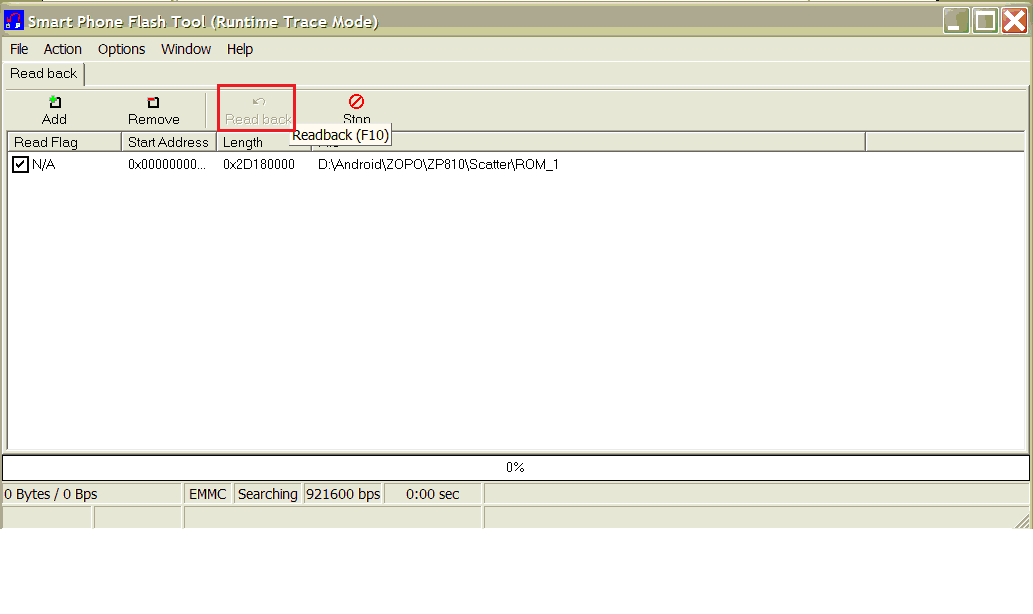
_______________________________________________________________ - Press “Read back” or F10
Spoiler for Pic. 8:
_______________________________________________________________ - Connect device to PC and wait untill SP FT will finish reading back precedure. Green circle will appear at the end of the process (in case of SP FT V2 Message with download report). Disconnect device from PC, Reset battery.
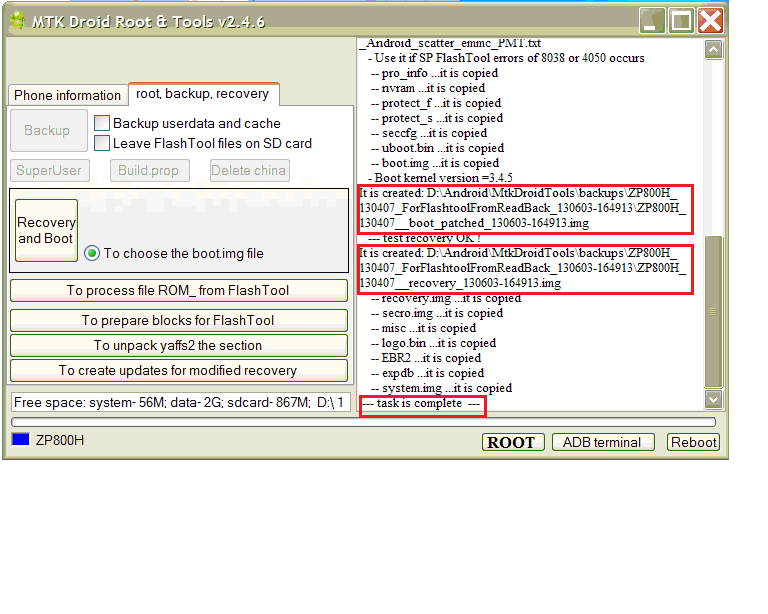
_______________________________________________________________ - Switch ON device and connect it to PC. Run MTKdroidTools.exe and Go To “root, backup, recovery” tab and press “To process file ROM_ from FlashTool” buton and locate ROM_X file created in step 10-15 and press “Open”
Spoiler for Pic. 9:
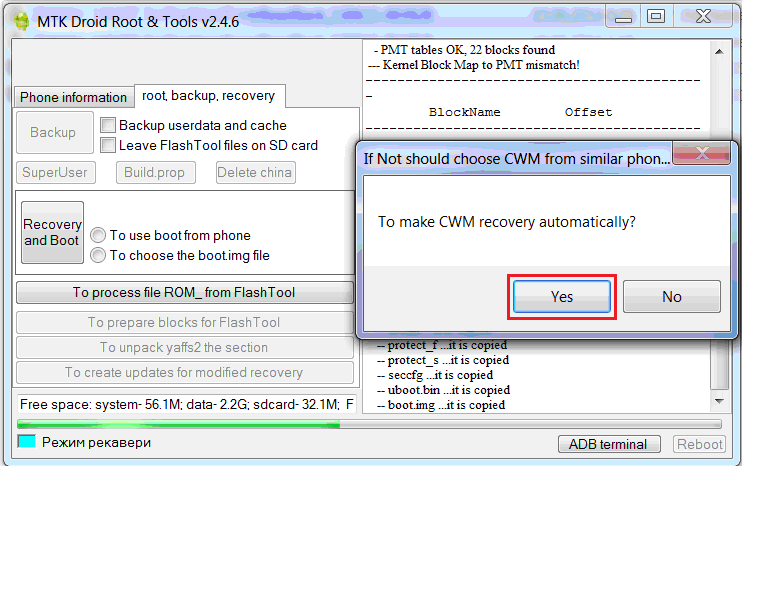
_______________________________________________________________ - MDT will start processing Readback file and later will ask “To make CWM recovery automatically?” Press “Yes”.
Spoiler for Pic. 10:
_______________________________________________________________ - After processing complete you will see “Task is complete” message at log window at the right bottom. Addionaly will be indicated that Patched boot and modified recovery are made and their location on PC. Remember these file names and location. Normally they are located in MtkDroidTools\Backup\XXXX_XXXX_ForflashToolFromReadBack_XXXX-XXXX folder.
Spoiler for Pic. 11:
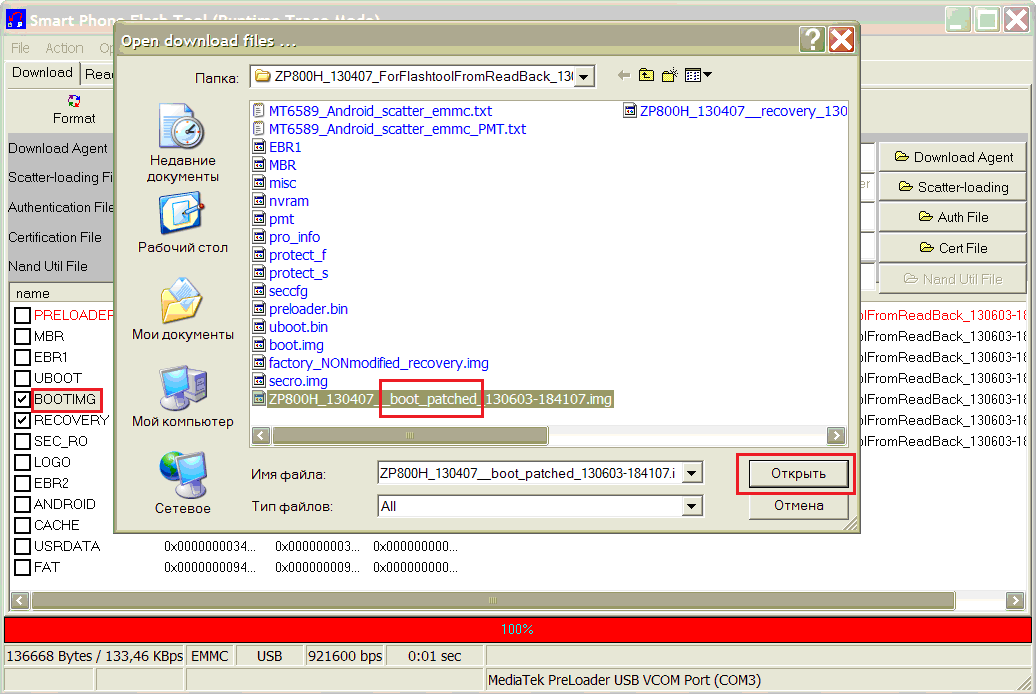
_______________________________________________________________ - Open SP FlashTool, Press Scatter-loading and open Scatter file created in step 6. Make sure all Sections are unchecked. Click on “BOOTIMG” and choose patched boot created in step 18.
Spoiler for Pic. 12:
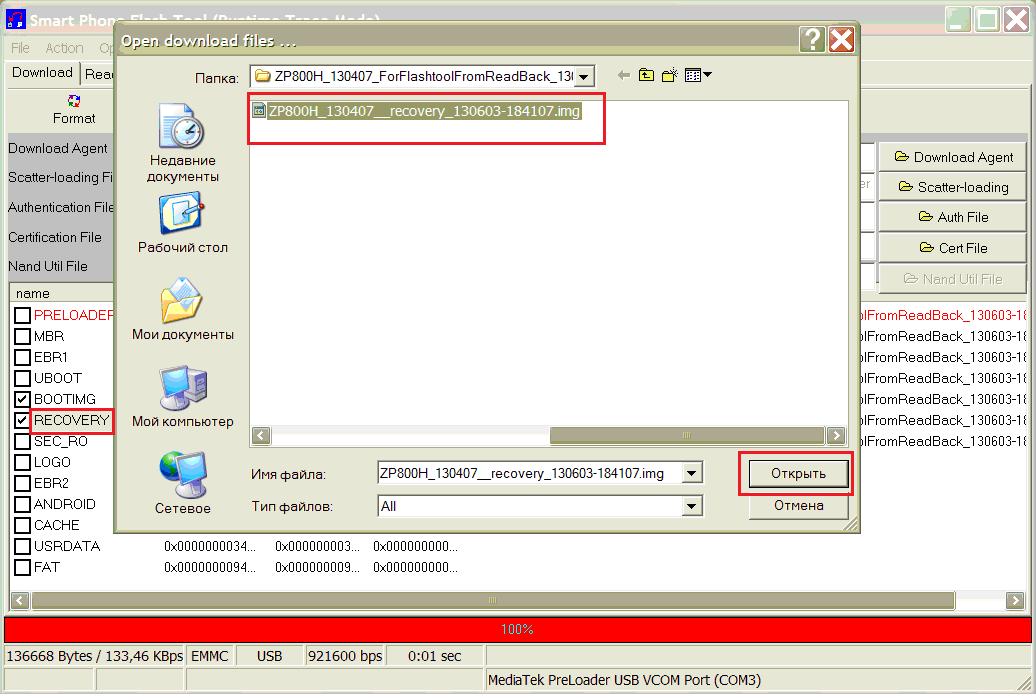
_______________________________________________________________ - Click on “RECOVERY” and choose modified recovery (CWM) created in step 18.
Spoiler for Pic. 13:
_______________________________________________________________ - Disconnect device from PC, Switch OFF and Remove-Install Battery.
_______________________________________________________________ - Press “Download” or F9 in SP FlashTool and connect device to PC. Wait until Boot and Recovery will be flashed.
_______________________________________________________________ - Disconnect device from PC, reset battery, Insert External SD card with minimum 1Gb free space (important!), Connect device to PC and holding “Vol +” and “Power” buttons enter into Recovery mode (CWM already)
NOTE: Alternative way is to Switch ON device, Run MDT and press Reboot button on the right botton and then choose “…in recovery”.
_______________________________________________________________ - Run MtkDroidTools.exe Go To “root, backup, recovery” tab and press “Backup” button to create complete backup of your device. Wait until MDT process backup. If you want to pack it Agree with question at the end of processing.
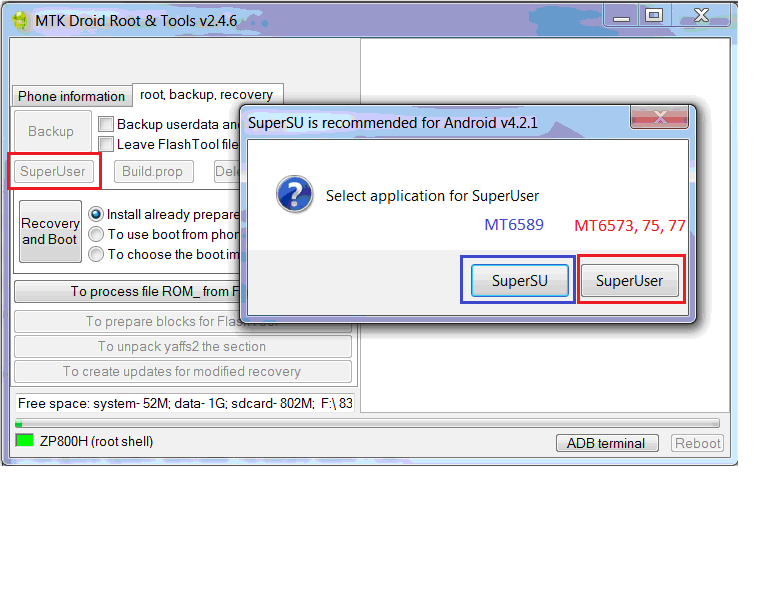
_______________________________________________________________ - In MDT Press “SuperUser” button and choose SuperSU for MTK6589 devices or SuperUser for the previous platforms 73, 75, 77
Spoiler for Pic. 14:
_______________________________________________________________ - Reboot phone and in case of SuperSU installation enter SU application and update SU binary in normal mode.
NOTE: In some cases Factory Data reset is required from CWM after SU installation. Reset only if SU doesn’t work. Take a note that all userdata will be lost
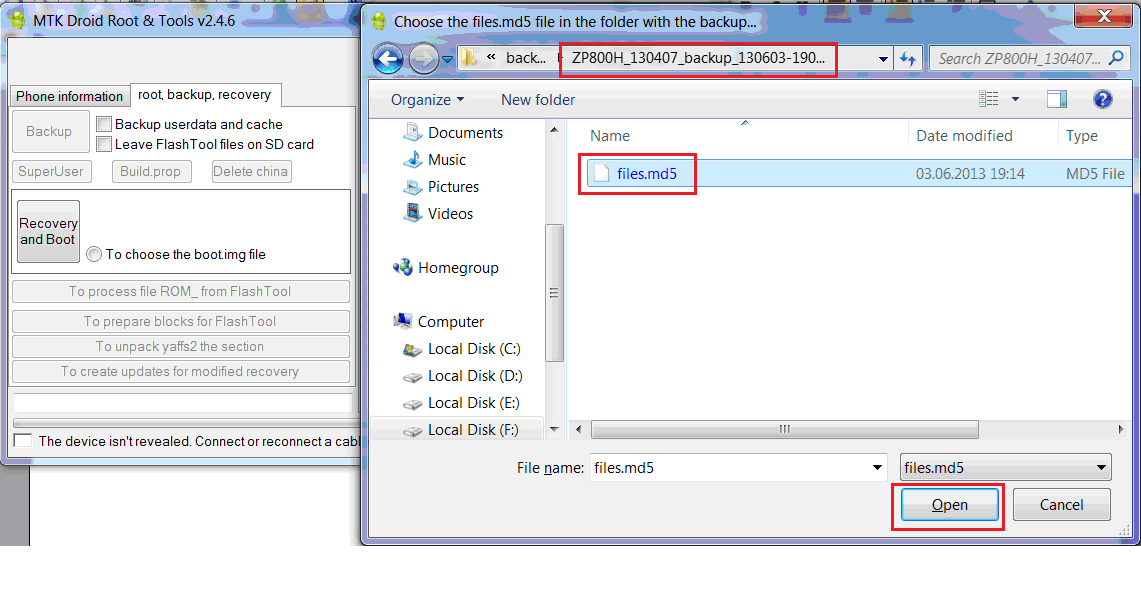
_______________________________________________________________ - In order to finalize backup run MTKdroidTools.exe Press “To Prepare Blocks for FlashTool and locate files.md5 at MTKdroidTools\Backup\DeviceName_XXXXXX_backup_XXXXX-XXXX folder. Press “open”
Spoiler for Pic. 15:
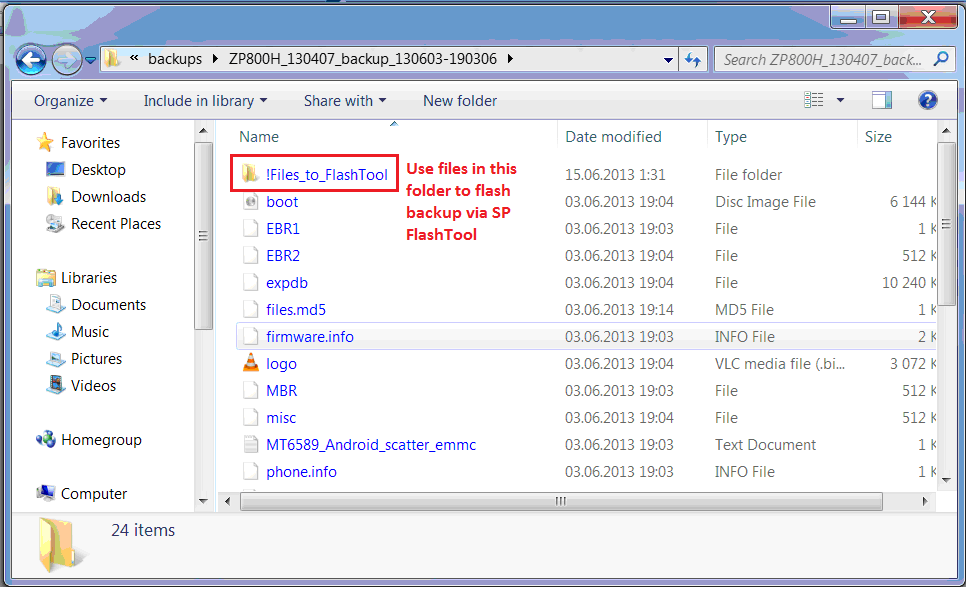
After processing files in backup folder will appear “!Files_To_FlashTool” folder which should be used for flashing backup in SP FlashTool.
Spoiler for Pic. 16:
_______________________________________________________________
DONE!Now device has Full FlashTool Backup, CWM, Permanent Root Shell and Super User application.

Unified Patches, Procedures etc.
Dedicated for General Platform Mods.
--------------------------------------------------------------------------------------------------------------------------------------------------------
MEDIATEK MT6589 PLATFORM
Spoiler for MTK6589 Platform:
1. ROOTING
Spoiler for ROOTING:
2. INTERNAL MEMORY RE-PARTITION
Spoiler for Internal Memory Repartition:
1. Install CWM / TWRP (applicable to your phone)
2. Make a Backup (Post 1, D.I.A)
3. Download & Install apk: http://ge.tt/7g5YQ5i/v/0?c
4. Run Meteos MTK6589 apk
5. Choose internal memory re-partition depending on your ROM (phone storage) size.
NOTE:Please, do not choose option with more size than your ROM has. I was trying to choose 2.77Gb for ZP810 and got boot loop as Phone memory was not enough to create such size. If you want to be safe - use 2.5Gb with 4GB ROM and 5GB with 8GB ROM phones.
6. Reboot into Recovery mode (Post 1, C.II.1-3)
7. Choose Wipe data/factory reset
Spoiler for Img. 1:

8. Confirm, YES
Spoiler for Img. 2:

11. Choose Backup and restore
Spoiler for Img. 3:
12. Choose Advanced restore
Spoiler for Img. 4:
13. Choose your last backup (by date/time)
Spoiler for Img. 5:
14. Choose restore data
Spoiler for Img. 6:
15. Reboot your phone
(Credits to Spanish android community for APK)
3. BASEBAND MODULE
Spoiler for Radio module:
Baseband module is responsible for GSM/CDMA network performance. Usually later revisions fix bugs and improve signal of mobile network.
Applicable NOT to ALLMT6589 devices. Reported incompability with AMOI N828 / THL W7s
To check Baseband version and date go to Settings - About
Spoiler for Baseband:
To install Baseband modules use CWM(Post 1, C.II.B)
NOTE: Make a backup (Post 1, D) before flashing Baseband module. Optionally copy /system/etc/firmware/modem.img to PC as a backup.
1. 28 March 2013
2. 10 April 2013
3. 08 May 2013
NOTE: For 08 May 2013 module there is report of GSM Network crash after data/factory reset, so avoid reset function.
HARWARE RECOVERY - TEST POINT SAMPLES
Spoiler for TEST POINTS:
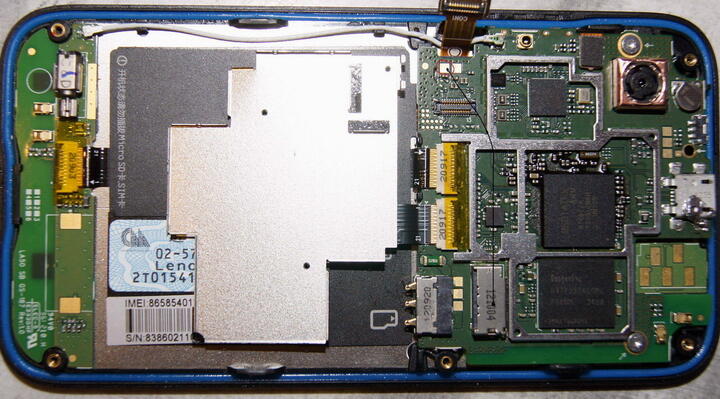
Test Point Samples:
MTK6575 devices
B79

ONE X

STAR N9770

MTK6577 DEVICES
FeiTeng N9300+

Lenovo A660

THL W3+

ZOPO ZP900

MTK6589 DEVICES
THL W8

MTK6575 devices
Spoiler for MTK6575 DEVICES:
B79
Spoiler for B79:
ONE X
Spoiler for One x:
STAR N9770
Spoiler for STAR N9770:
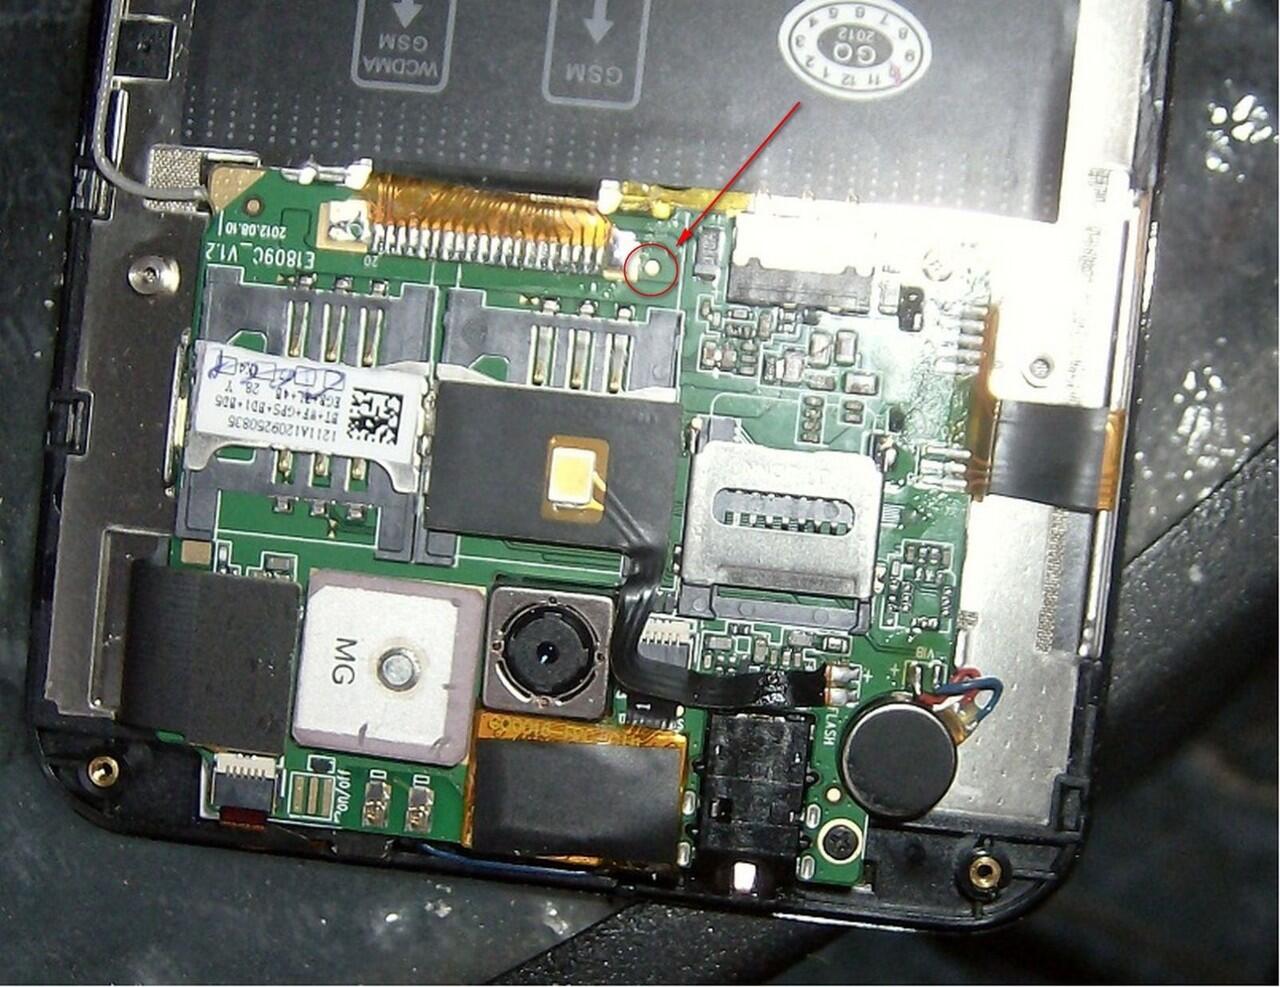
MTK6577 DEVICES
Spoiler for MTK6577 devices:
FeiTeng N9300+
Spoiler for FeiTeng N9300+:

Lenovo A660
Spoiler for Lenovo A660:
THL W3+
Spoiler for THL W3+:
ZOPO ZP900
Spoiler for ZP900:
MTK6589 DEVICES
THL W8
Spoiler for THL W8:
Diubah oleh androidmedia 19-06-2013 20:19
0