TS
dHika_wannabe
[share] FORES ( Fotografi Regional Semarang )
Inspirasi dari berbagai masukan akhirnya terlahir juga trit baru ini, 
yg smoga jadi tempat efektif dan guyub bagi segala kalangan yg mungkin:
-hobi
-bakat
-isenk
-pengen tau
-pro
-amatir
-apa aja
menemani trit ini yg berisi foto upload karya warga reg.semarang, pada trit baru ini berisi share/all about Fotografi.....
simpelnya trit ini sebagai media/room buat sharing apa aja dah yg berhubungan dengan fotografi....
semua warga reg.semarang bisa berbagi ilmunya disini,
masukan, penambahan materi, saran kritik sangat diterima,
karena TS juga nubi bginian, jadi mari share bersama
INDEX:
Fotografi Dasar
Yang Membuat Foto Jadi Menarik
Lighting/ Pencahayaan
Exposure
Tips: Beberapa cara untuk menonjolkan warna
Kumpulan Artikel n Tips (English Version) file zip
Fungsi Shutter dan Aperture dalam Mengontrol Exposure
Film Speed - Kepekaan Film/Sensor Digital
Flash Photography with Canon EOS Cameras (file zip)
Beginners guide to black & white photography (file rar)
Complete Guide to the Nikon D70 (file rar)
Metering
Tentang Kamera Plastik/ Toycam/ Lomography
Perbedaan Kamera Plastik Diana n Holga
Cara menghasilkan Light Leaks
Redscale, Teknik Membalik Film
Eksperimen Film
CROSS PROCESS dan FILM SLIDE-NEGATIF
Kamera Pinhole
Foto Candid, Tips Jitu Menjepret Foto Candid
Istilah Fotografi dari A-L
Istilah Fotografi dari M-Z
Depth of Field (DOF)
Tips Memilih Kamera Digital
Tips Merawat Kamera
Macam dan Jenis Pembersih Lensa/Kamera
Tips Memaksimalkan Kamera Ponsel
Perbedaan Kamera Compact dan DSLR
Artikel Tentang Fotografi (link kaskus)
Photography Tips (pdf)
Diana f Camera Manual (pdf)
Yang Suka Narsis Klik Sadja
Digital Camera (pdf)
Cuci Film BW (black & white)
Sekilas Kamera Film/Kamera Analog
Daftar harga cuci, scan, cetak di lab2 foto di semarang
Membuat Pinhole Camera: Part1 Part 2 Part 3 Part 4
Papercraft Pinhole Camera
Media Penyimpanan Kamera (dry box)
Membuat Dry Box Sendiri versi I
Membuat Dry Box Sendiri Versi II
Complete Guide Nikon D70
About Model, Fashion and Wedding Photography
Tips Simpel Fotografi Panggung/Konser
Kelebihan Lensa Fix/Prime dan Sedikit Info Tentang Filter IR
Langkah Menggunakan Filter IR
About Fotografi Jurnalistik
About CCD/ Image Sensor (link)
smoga trit ini bisa dimanfaatkan dengan sebaik-baiknya
thx to: kaskus, reg.semarang, RL, smua yg kasi input disini
0
70.9K
1.6K

Komentar yang asik ya
Mari bergabung, dapatkan informasi dan teman baru!
Semarang
2.5KThread•1.2KAnggota
Tampilkan semua post
GIGIKITA
#160
pinhole part 4
Lightproofing
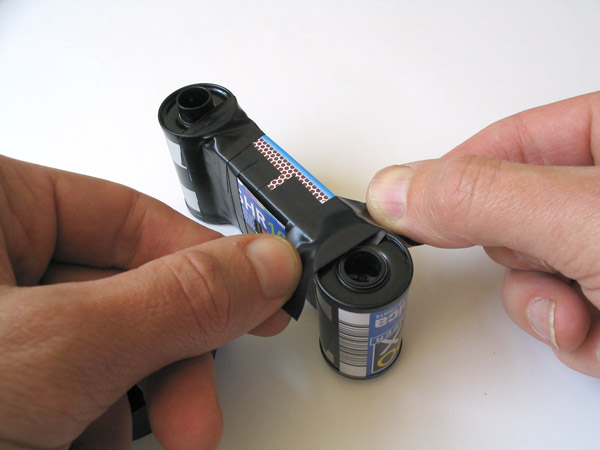
If you want your pictures to be free from lightleaks, it's very important that no light at all can get into the camera other than through the pinhole! Black electrical PVC tape is very effective at keeping out light.
The most important places to seal are between the film canisters and the matchbox. Place strips of tape down the front on both sides. Use two layers and make sure it is stuck down firmly all around
![kaskus-image]()
Pay attention to the ends of each reel. Add more tape here, trim around the spindles so that the tape adhesive doesnt stick and prevent the film being wound on. Again, use a couple of layers and check all around both joints to make sure they are totally sealed.
![kaskus-image]()
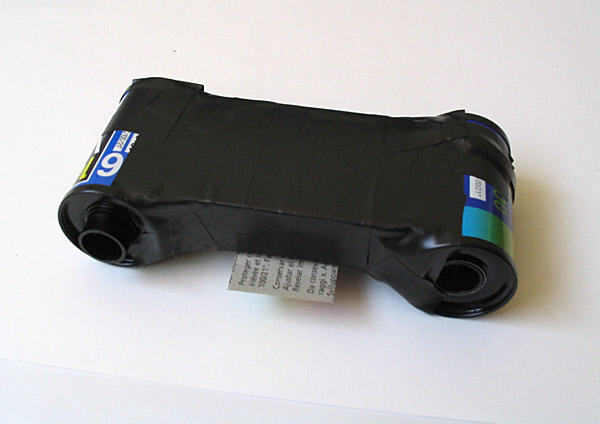
The cardboard of the matchbox will also leak a small amount of light, especially in bright conditions. This will give your photos a mottled red effect. If you don't want this, tape all over the back and sides of the box so that no cardboard is showing
![kaskus-image]()
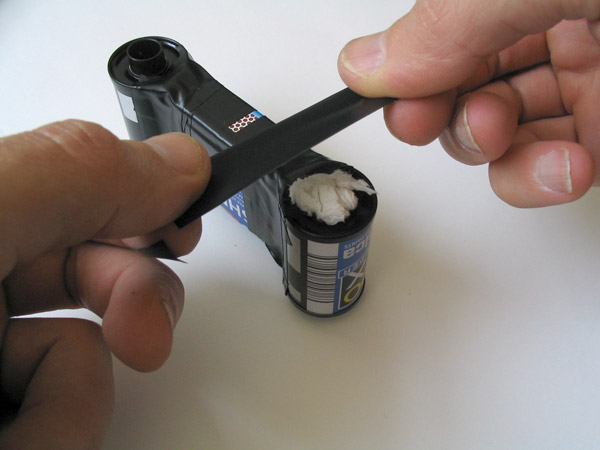
Winder
To make it easier to wind the film on, stick something into the top of the empty spool. Here I used the ring pull from the can,
![kaskus-image]()
As you wind the film on, the film in the take up spool will tend to keep springing back. To keep some tension on the take up spool, place a little tissue paper on the base of the take up spool and tape over it. Don't make this too tight or it will be difficult to wind the film on.
![kaskus-image]()
![kaskus-image]()
That's it! The completed camera is now ready to used. Make sure the shutter is closed. To wind the film on, turn the winder on the empty take up spool anticlockwise. Listen for the clicks. Count 6 clicks for each photo if using a 24mm square frame, 8 clicks if using a 36 x 24mm frame. DO NOT try to wind the film back into the other canister with the clciker in place - the clciker will probably tear the film.
Using the camera
The Matchbox Pinhole camera has an f number of about f90. There's no need to be very accurate about exposure times when using colour print film, use the following as a rough guide when using ISO100 or 200 film.
-Outside, sunshine: 1 or 2 seconds
-Outside, cloudy conditions: 5 seconds
-Indoors, normal room lighting: 5 - 10 minutes
When the film can't be wound on any more it's time to unload the film. You can just cut the box open, but if you are careful you can reuse the camera many times. If you are reusing the camera, carefully push back the tape to find the end of the clicker plastic. and remove it. Seal the tape back down again, and wind the film back into the oringinal canister. Remove the tape carefully from around this and cut off the film, leaving enough sticking out of the camera to splice your next roll.
The film can be developed by any normal photo lab. It might be a good idea to tell them that the frame spacings might be a bit irregular when you drop the film off - if the staff are helpful they might take a little more care when printing.
sumbernya
If you want your pictures to be free from lightleaks, it's very important that no light at all can get into the camera other than through the pinhole! Black electrical PVC tape is very effective at keeping out light.
The most important places to seal are between the film canisters and the matchbox. Place strips of tape down the front on both sides. Use two layers and make sure it is stuck down firmly all around

Pay attention to the ends of each reel. Add more tape here, trim around the spindles so that the tape adhesive doesnt stick and prevent the film being wound on. Again, use a couple of layers and check all around both joints to make sure they are totally sealed.
The cardboard of the matchbox will also leak a small amount of light, especially in bright conditions. This will give your photos a mottled red effect. If you don't want this, tape all over the back and sides of the box so that no cardboard is showing
Winder
To make it easier to wind the film on, stick something into the top of the empty spool. Here I used the ring pull from the can,

As you wind the film on, the film in the take up spool will tend to keep springing back. To keep some tension on the take up spool, place a little tissue paper on the base of the take up spool and tape over it. Don't make this too tight or it will be difficult to wind the film on.

That's it! The completed camera is now ready to used. Make sure the shutter is closed. To wind the film on, turn the winder on the empty take up spool anticlockwise. Listen for the clicks. Count 6 clicks for each photo if using a 24mm square frame, 8 clicks if using a 36 x 24mm frame. DO NOT try to wind the film back into the other canister with the clciker in place - the clciker will probably tear the film.
Using the camera
The Matchbox Pinhole camera has an f number of about f90. There's no need to be very accurate about exposure times when using colour print film, use the following as a rough guide when using ISO100 or 200 film.
-Outside, sunshine: 1 or 2 seconds
-Outside, cloudy conditions: 5 seconds
-Indoors, normal room lighting: 5 - 10 minutes
When the film can't be wound on any more it's time to unload the film. You can just cut the box open, but if you are careful you can reuse the camera many times. If you are reusing the camera, carefully push back the tape to find the end of the clicker plastic. and remove it. Seal the tape back down again, and wind the film back into the oringinal canister. Remove the tape carefully from around this and cut off the film, leaving enough sticking out of the camera to splice your next roll.
The film can be developed by any normal photo lab. It might be a good idea to tell them that the frame spacings might be a bit irregular when you drop the film off - if the staff are helpful they might take a little more care when printing.
sumbernya
0